


How to Add External JavaScript Libraries to Flowise for Custom Chatbot Tools
Artificial Intelligence Development


In the rapidly evolving world of machine learning (ML), the ability to quickly move from model training to deployment is crucial to being able to build software on top of it. H2O.ai’s AutoML provides a powerful tool for automated model training, enabling data scientists and developers to efficiently create high-quality predictive models. At BlueLabel, in our work training ML models, I’ve come to love the power and flexibility of the H2O.ai product suite, especially its AutoML capabilities. However, the real challenge often begins when it’s time to deploy these models into a production environment, which is where AWS’s SageMaker service comes into play. AWS SageMaker offers a serverless platform to host and manage these models as endpoints that can expose these models to downstream apps, web sites and other software tools. However, the process to go from H2O.ai to SageMaker is not obvious, nor documented well.
My name is Bobby Gill, and I am the co-founder of the BlueLabel AI consultancy. In this blog post, I’ll hope to bridge the gap between H2O.ai and SageMaker by sharing the hard-earned knowledge I’ve gained operationalizing H2O.ai models on AWS SageMaker. Specifically, I will walk through the steps involved in deploying an H2O.ai AutoML model to AWS SageMaker in the form of an ‘inference’ endpoint that can then be used in production workloads such as an app or website.
Before I get into, as the famous H.E. Pennypacker might say, ‘the real gritty-gritty’, let me spend a few words describing what my ML model does. In this example, I am using a binary classification ML model that I’ve trained using H2O.ai AutoML function to help predict the probability of a female producing at least 1 genetically normal (Euploid) embryo based on two key factors: the age of a female along with her AMH measurement. This blog post and the exercise contained within was driven by my desire to create a Fertility Calculator tool for my wife’s fertility blog (called ‘The Lucky Egg’) that leveraged machine learning to make it’s predictions. In order for me to build a ML-powered Fertility Calculator tool on her blog, I first needed to operationalize the model behind a HTTP-based API that could be called by my front end Javascript, which is what the rest of this tutorial will cover.
- Service: SageMaker
- Permissions:
    - AmazonSageMakerFullAccess
    - AmazonS3ReadOnlyAccess
    - AmazonEC2ContainerRegistryReadOnly
    - CloudWatchLogsFullAccess
At a high level, the steps to go from a model trained locally within an H2O.ai deployment to an HTTP endpoint hosted on SageMaker that can make predictions using this model requires the following:
The astute reader might be wonder as to why I am using Java rather than Python for this walk through and they would be right to ask the question. I trained the model using Python, I do all of my ML related development in Python and I haven’t written a lick of Java code since CS 134 at Waterloo. The reason for this choice is simply because working with MOJO files exported by H2O.ai is much more straightforward and streamlined for Java environments. While Python does offer a pathway to deploy MOJO files, it is not well-documented and relies on open source projects that looked to be dated and not maintained. I am sure you can achieve the same in Python, however, the Java approach is much simpler and requires little specialized Java knowledge beyond that one might have learned in an introductory CS class.
In order to deploy our model to SageMaker, we first need to understand how SageMaker expects to interact with a deployed model:
invocations (which is the method called to perform an inference)ping (a method used to health check the container)For exact specifications and requirements for a model to be deployed to SageMaker please refer to the AWS documentation here.
After running training a model in H2O.ai, the first step to hosting it in SageMaker is to export the model to file. H2O.ai natively supports exporting models to a MOJO (Model Object, Optimized) file. MOJOs are a representation of a ML model that is optimized for scoring and prediction in real time, which is what we intend to do by hosting it via n inference endpoint. Exporting a model in H2O.ai to MOJO is straight-forward. If you are using the H2O.ai Flow GUI tool, first load the model and then in the UI click on the button “Download Model Deployment Package (MOJO)”.

In order to deploy my ML model to SageMaker, we need to create a basic web service that implements the /invocations and /ping endpoints that SageMaker will communicate to it via. This web service will host the MOJO file representation of my trained model and perform inferences using it through the /invocations method. To host this API, I’ve decided to use the Java Spring Boot framework to create a very thin project (which I will refer to as the Fertility Calculator Service.) that wraps my prediction model and implements the two endpoints expected by SageMaker.
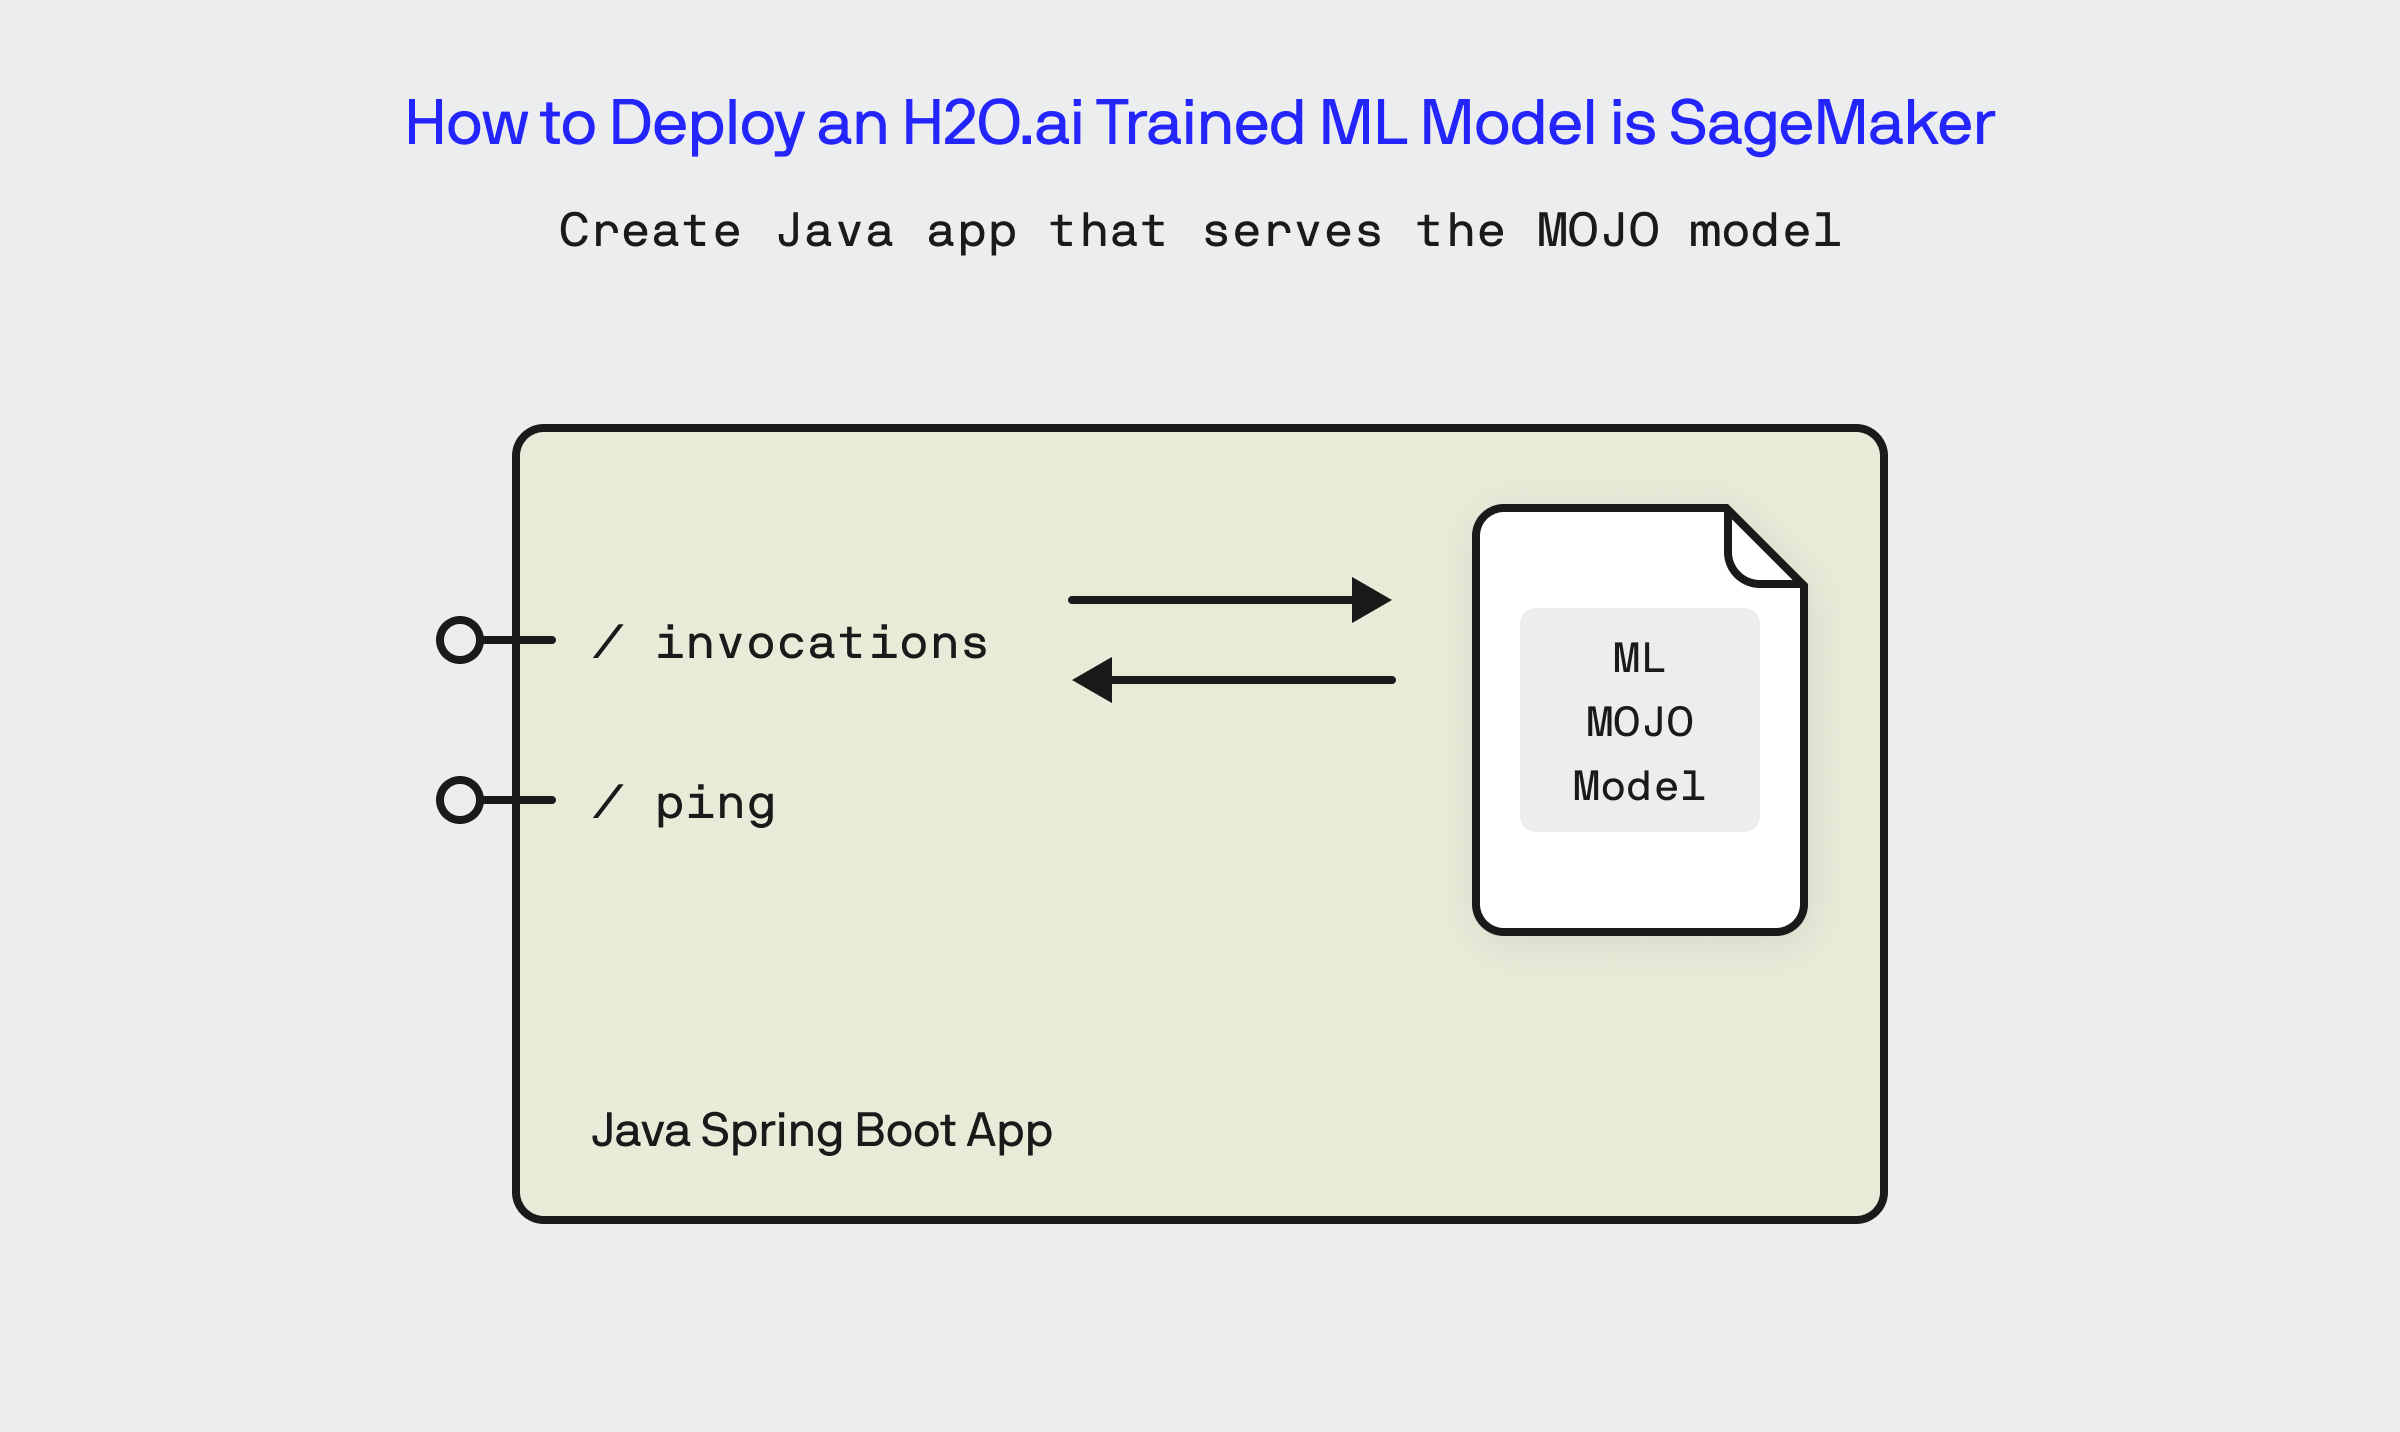
The code for the Fertility Calculator App is largely boilerplate and is contained within the FertilityCalculatorMojoApplication.java file within the GitHub repo. The name of the MOJO file that contains my model is “StackedEnsemble_BestOfFamily_7_AutoML_1_20240418_75305-MOJO.mojo”.
For non-Java programmers, its important that you place the MOJO file in the correct location of the project folder structure so that it’s packaged up properly by Gradle and then accessible via the Java classpath at runtime. Of everything in this blog post, this part is the one thing that left me stumped for a few hours. To save you similar agony, below you will find the folder structure that I used for this project:
src/
└── main/
    ├── java/
    │   └── com/
    │       └── yourcompany/
    │           └── yourproject/
    │               └── YourApplication.java
    └── resources/
        └── static/
            └── your_model.mojo
The endpoint definitions needed for SageMaker are relatively straight forward to implement:
// Health check endpoint used by SageMaker
    @GetMapping("/ping")
    public String ping() {
        return "Healthy";
    }

    // Inference endpoint used by SageMaker
    @PostMapping("/invocations")
    public String invocations(@RequestBody PredictionRequest request) throws Exception {
        RowData row = new RowData();
        row.put("age", request.getAge());
        row.put("amh", request.getAmh());

        BinomialModelPrediction prediction = model.predictBinomial(row);
        return Double.toString(prediction.classProbabilities[1]); // Assuming class "1" is the positive class
    }
In the above, you can see /invocations endpoint extracting the passed in AMH and Age parameters from the request POST body and then using a BinomialModelPrediction object created from my MOJO file to make the prediction and return the result.
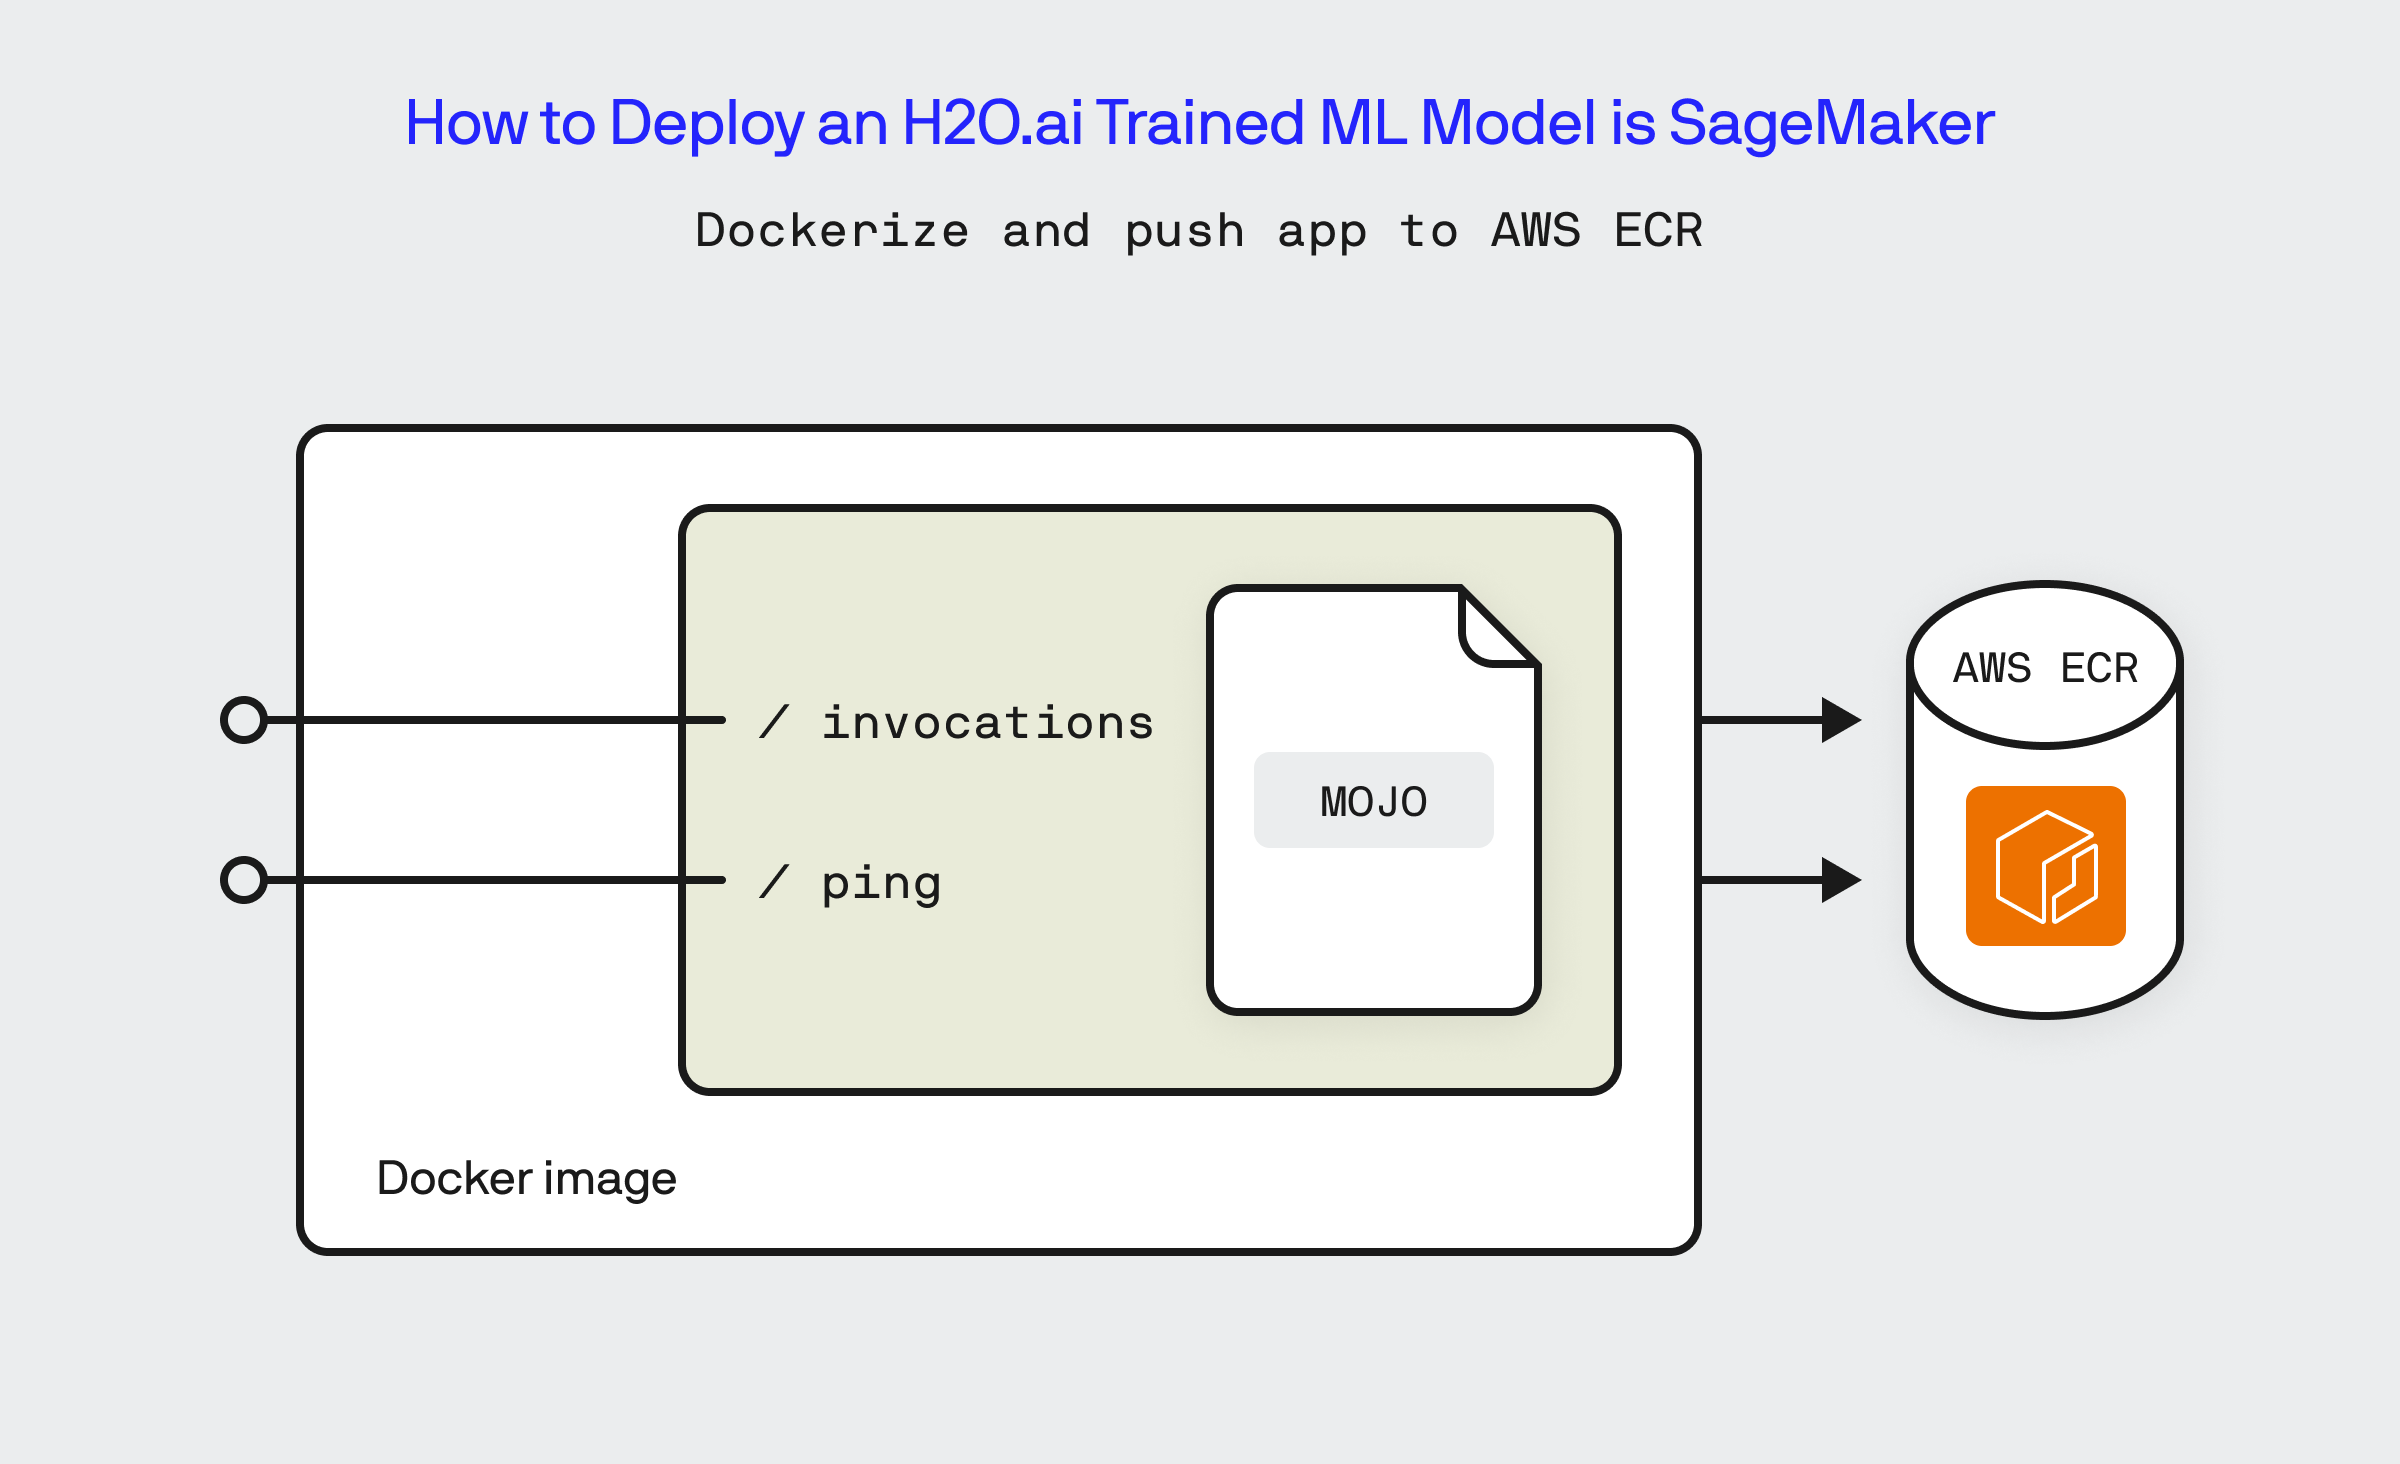
In the next series of steps, we need to take the Fertility Calculator Service and package it as a Docker image and push it to a Amazon ECR repository.
Once I’ve written the logic to perform the inference, the next step is to compile the Java code into a self-contained JAR file via Gradle:
/gradlew build
The generated JAR file should then be located within the project’s build/libs folder, in the case of our example it is named ‘fertility-calculator-mojo-0.0.1-SNAPSHOT.jar’
Firstly, I create a script file (serve.sh) that will respond to the ‘serve’ command that SageMaker will send to the Docker container when its launched, this script will initialize and launch our Fertility Calculator Service.
#!/bin/bash

# Script to start the Spring Boot application

# Default to "serve" if no command is provided
if [ "$1" == "serve" ]; then
    echo "Starting Spring Boot Application"
    exec java -jar /app/fertility-calculator-mojo-0.0.1-SNAPSHOT.jar
else
    echo "Command not recognized"
    exec "$@"
fi
Now I setup a basic Dockerfile that will copy into the running Docker container the JAR file for my Fertility Calculator Service and the aforementioned serve.sh file and set the entry point for the Docker container to be the serve.sh script.
# Use an official Java runtime as a parent image
FROM openjdk:17-jdk-slim

# Set the working directory in the container
WORKDIR /app

# Copy the JAR file into the container at /app
COPY ./build/libs/fertility-calculator-mojo-0.0.1-SNAPSHOT.jar /app/fertility-calculator-mojo-0.0.1-SNAPSHOT.jar

# Copy the serve script into the container
COPY serve.sh /app/serve.sh

# Make port 8080 available to the world outside this container
EXPOSE 8080

# Make the script executable and set it as the entry point
RUN chmod +x /app/serve.sh
ENTRYPOINT ["/app/serve.sh"]

# Default command
CMD ["serve"]
Once we’ve setup our Dockerfile, we can test to make sure that the container image builds properly by executing:
docker build -t fertility-calculator-mojo .
With a locally configured instance of the AWS CLI, it is relatively straight forward to push the Docker image created in the last step to the Amazon Elastic Cloud Registry:
First, we create the ECR repository:
aws ecr create-repository --repository-name <respository name>
Then, we authenticate the locally running instance of docker to be able to access the ECR repository:
aws ecr get-login-password --region <region> | docker login --username AWS --password-stdin <aws.accountid>.dkr.ecr.<region>.amazonaws.com
Now, tag the Docker image:
docker tag <repository name>:latest <aws.accountid>.dkr.ecr.<region>.amazonaws.com/<repository name>:latest
Finally, push the Docker image up to ECR:
docker push <aws.accountid>.dkr.ecr.<region>.amazonaws.com/<repository name>:latest
Once we’ve deployed the Fertility Calculator Service to ECR, we are almost done. The next set of steps is designed to create and configure AWS SageMaker to host the Docker image as a model that can be used for inference. We will first create a Model in AWS SageMaker that is based off the Fertility Calculator Service image that we deployed to ECR. Once done, the remaining steps are to create a SageMaker endpoint configuration and finally the SageMaker endpoint.
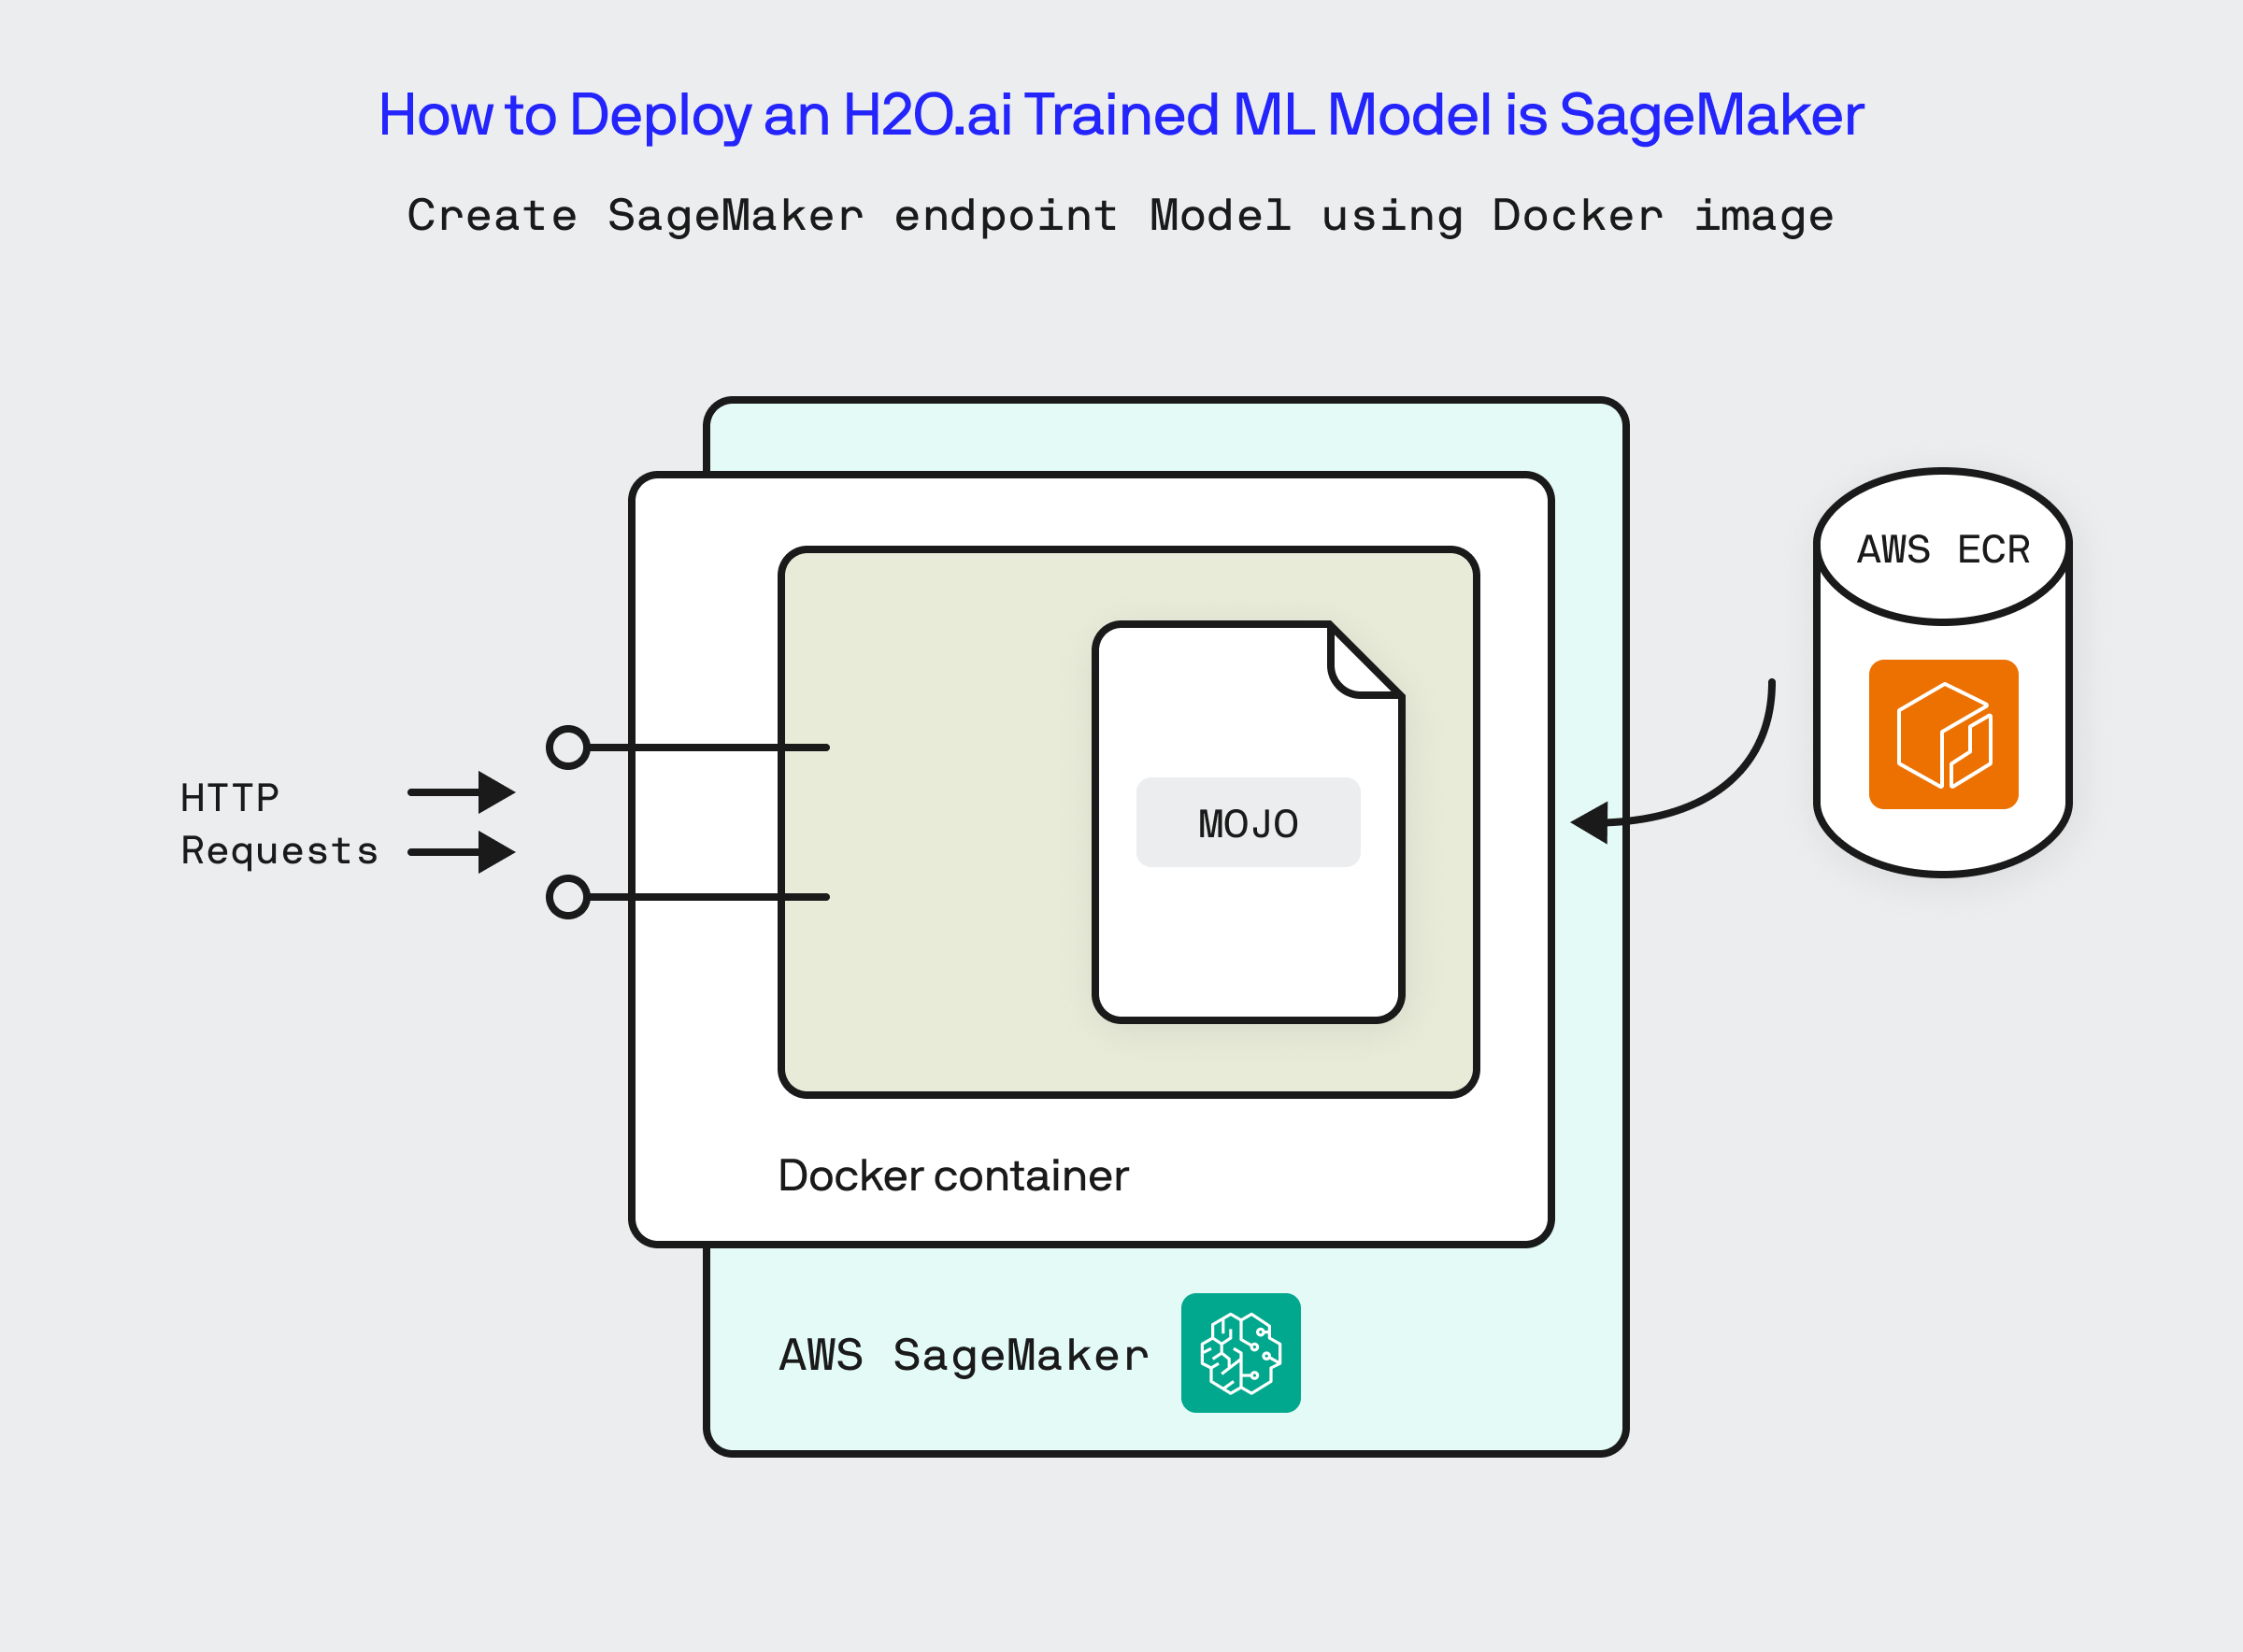
To create the SageMaker Model execute the following command:
aws sagemaker create-model --model-name <model name> --primary-container Image="<aws.accountid>.dkr.ecr.us-east-1.amazonaws.com/<repository name>" --execution-role-arn arn:aws:iam::<aws.accountid>:role/<role you created in the pre-requisites>
Once the Model is created, execute the following command to create an Endpoint Configuration object:
aws sagemaker create-endpoint-config --endpoint-config-name <endpoint configuration name> --production-variants VariantName=variant-1,ModelName=<model name>,InitialInstanceCount=1,InstanceType=ml.t2.medium
Now the final step in this long, arduous journey is to create the SageMaker Endpoint based on this configuration:
aws sagemaker create-endpoint --endpoint-name <endpoint name> --endpoint-config-name <endpoint configuration name>
Once this command completes, if you login to the AWS SageMaker console, under Inference you will see the endpoint being created. In the SageMaker console, you will be able to copy the HTTP endpoint that hosts our app and which can be used to generate inferences against our model! If you can navigate the process of obtaining a bearer OAuth token against AWS within Postman, then you can directly run inferences against your endpoint from there!
With the AWS SageMaker created and started successfully, the final step in this walk through is to test that the endpoint works and is accessible. To test the endpoint, we open up the AWS CLI on my development machine and execute the following:
aws sagemaker-runtime invoke-endpoint --endpoint-name <endpoint name> --body '{"age":29, "amh":3}' --content-type 'application/json' --region <region>
This executes the inference HTTP endpoint, passing in an age of ’29’ and an amh level of ‘3’, and voila, I am returned the probability of ‘0.83’ from my ML model now hosted in AWS SageMaker!
The endpoint we’ve created and deployed as part of this tutorial is an authenticated endpoint that requires an IAM user context in order to call it. While this might work for production workloads that will be communicating with it from within AWS using an IAM role, what’s missing is being able to access the this SageMaker endpoint via a publicly accessible URL like what I will need to do to integrate this API into my front end Fertility Calculator tool. Luckily, this last step can be easily achieved by creating an AWS API Gateway and integrating it directly to the SageMaker endpoint so that it proxies request to and from the inference endpoint. Setting this up is rather straight forward and builds directly off of what we’ve achieved thus far. You can follow this excellent guide from AWS to learn how to do so.
We’ve journeyed through the meticulous process of deploying an H2O.ai AutoML model onto AWS I hope this guide helps to untangle the steps needed to operationalize an H2O.ai machine learning model within AWS SageMaker. This approach is just one way of operationalizing an machine learning model, but it is by no means the only way to skin the proverbial cat. By leveraging the robust capabilities of H2O.ai for model training and SageMaker for deployment, we’ve established a powerful and scalable machine learning solution that stands ready to tackle real-world applications.
To run the code used in this blog, please remember to checkout the GitHub repository here.