


How to Add External JavaScript Libraries to Flowise for Custom Chatbot Tools
Artificial Intelligence Development


At Blue Label Labs, we use ReactJS as our primary tool for building modern web apps and generally host them on Amazon Web Services.
The neat thing about a ReactJS web app is that at the end of the day, it’s just a bunch of static HTML/CSS/JavaScript files that can be statically hosted on a AWS S3 bucket and then globally distributed via the AWS CloudFront CDN.
In this article, I will walk through the steps to setup an automatic build and deploy pipeline of a ReactJS web app to static hosting on Amazon S3 (front-ended by a CloudFront CDN) using Amazon’s suite of CD/CI tools, namely CodeBuild and CodePipeline.
In this step we will setup a S3 bucket where all static build outputs of the ReactJS app will live and be hosted from. We are going to setup this bucket so it’s publicly viewable, which is one of the only times leaving a bucket publicly visible to the Internet is deemed acceptable.
Login to the S3 console, click ‘Create bucket’ and give the bucket a name like “web-app-hosting”. Use the following settings when setting it up:
Open up the newly created bucket, click on ‘Permissions’ and then edit the bucket policy so that is looks like this:
{
    "Version": "2012-10-17",
    "Statement": [
        {
            "Sid": "PublicReadGetObject",
            "Effect": "Allow",
            "Principal": "",
            "Action": [
                "s3:GetObject",
                "s3:GetObjectVersion"
            ],
            "Resource": "arn:aws:s3:::<bucket-name>/"
        }
    ]
}
This policy enables the Internet to access individual files in the bucket through the web. Note, it does not allow any type of write access or the ability to list the bucket or whatnot.
Take note of the ARN of the bucket above, because you will need it for the next step.
In this step, we will setup the CloudFront Distribution which will use the app files stored in the aforementioned S3 bucket and then globally distribute them to edge locations using Amazon’s CloudFront Content Delivery Network (CDN). Using a CDN is an easy way to globally distribute static files such that they are geographically near the users when they request to open the site, thus minimizing website load times.
Open up the CloudFront dashboard, click “Create Distribution”. In the resulting create screen, specify the following:
Once the distribution is created, you will need to make one modification to the Error pages behavior so that react-router plays well with the site being hosted on CloudFront and S3.
Once you’ve done the above, you should see something like this:
 Setup the CodePipeline and CodeBuild Projects
We will be using CodePipeline, in conjunction with CodeBuild, to orchestrate the build and deployment of the ReactJS web app to S3. CodePipeline is the top level orchestration tool that listens for changes to the source repository and then signals CodeBuild to compile the newly committed source artifacts. CodeBuild is a tool that takes as an input a source code artifact and then performs a series of “build” actions that ultimately produce as an output a compiled set of “build artifacts”.
Open the AWS CodePipeline console, click on “Create pipeline”
Clicking “Next”, you will then be prompted to choose a “Source provider” for the pipeline. In the dropdown box, choose the source code service where the source code for the project is hosted (Generally, we use Bitbucket). Once selected, then you then need to configure the connection properties to that service. Ultimately after the connection is configured, you will need to provide the following pieces of information:
Clicking “Next”, you will then be prompted to choose a “Build provider”. In the dropdown box, select “AWS CodeBuild”, then click on “Create project”. This will trigger a new pop-up window which will walk you through the process of creating the CodeBuild project before returning you back to the CodePipeline creation wizard.
In the CodeBuild setup wizard, make the following choices:
At this point, you should be back in the CodePipeline wizard, click “Next” and then choose “Skip deploy stage” and then “Finish” to start the creation of the CodePipeline.
At this point, the CodePipeline will be created and it will attempt to run a build using the source provider and CodeBuild provider project we specified. This will FAIL, don’t worry, just breathe, we are going to now fix this.
Before we do that, we need to take care of some security housekeeping to give the CodeBuild service role permissions to the S3 directory and to trigger the CloudFront CDN to refresh its contents.
Open the S3 Console and then open the S3 bucket we created previously. Click on Permissions and then in Bucket Policy edit the JSON policy so that it looks like this:
{
    "Version": "2012-10-17",
    "Statement": [
        {
            "Sid": "PublicReadGetObject",
            "Effect": "Allow",
            "Principal": "*",
            "Action": [
                "s3:GetObject",
                "s3:GetObjectVersion"
            ],
            "Resource": "arn:aws:s3:::<bucket-name>/*"
        },
        {
            "Sid": "Stmt1597860486271",
            "Effect": "Allow",
            "Principal": {
                "AWS": "<arn of CodeBuild IAM role>"
            },
            "Action": "*",
            "Resource": "arn:aws:s3:::<bucket-name>/*"
        }
    ]
}
The above Bucket Policy now gives CodeBuild the permissions necessary to update the contents of the S3 bucket. However, we are not done setting up the roles and permissions!
In this step, we need to give permissions to the CodeBuild service role to be able to create an “invalidation” against the CloudFront distribution we setup for our web app. An ‘invalidation‘ essentially tells CloudFront to refresh its contents from the S3 bucket and push those changes to all of the regional CDN endpoints.
Open the IAM console and create a new Policy with the following JSON:
{
    "Version": "2012-10-17",
    "Statement": [
        {
            "Sid": "VisualEditor0",
            "Effect": "Allow",
            "Action": "cloudfront:CreateInvalidation",
            "Resource": [
                "<arn of CloudFront Distribution>"
            ]
        }
    ]
}
After creating the above Policy, then open up the IAM Roles section, locate the CodeBuild service role and click it open. Under the ‘Permissions’ tab, click ‘Add Permissions’ and attach the Policy you just created in the previous step.
At this point, our CodeBuild service role now has all the permissions it needs to deploy the ReactJS web app.
In the previous steps, we setup a shell CodeBuild project which doesn’t have any real meat to it. In this step, we will modify the “buildspec” of the CodeBuild project with the commands that we want it to use when building the ReactJS app. The buildspec defines the shell commands that need to be run during various phases of compilation in YAML format.
In the CodeBuild console, open up the CodeBuild project created when we created the CodePipeline pipeline. Under ‘Edit’, choose ‘Buildspec’ and then change the ‘Build specification’ option to be ‘Insert build commands’ and then choose ‘Open Build Editor’.
In the resulting window, you will configure the build commands run by CodeBuild through a standardized YAML file. (Take note of the <> brackets in the YAML, you will need to replace these with the actual values specific to your deployment)
version: 0.2

phases:
  install:
    #If you use the Ubuntu standard image 2.0 or later, you must specify runtime-versions.
    #If you specify runtime-versions and use an image other than Ubuntu standard image 2.0, the build fails.
    runtime-versions:
      nodejs: 16
  pre_build:
    commands:
      - echo Installing source NPM dependencies...
      - npm install
  build:
    commands:
      - echo Build started on 'date'
      - npm run build
  post_build:
    commands:
      - aws s3 cp --recursive --acl public-read ./build s3://<bucket-name>/
      - aws s3 cp --acl public-read --cache-control="max-age=0, no-cache, no-store, must-revalidate" ./build/index.html s3://<bucket-name>/
      - aws cloudfront create-invalidation --distribution-id <cloudfront-distribution-id> --paths /index.html
artifacts:
  files:
    - "build/*"
    - "build/**/*"
The above YAML file is pretty straightforward.
In the pre_build phase of the execution, we install all of the NPM package dependencies.
In the build stage, we execute the NPM run script to compile and package the web app into the build folder.
In the post_build phase, the script does 3 things:
Save your changes to the buildspec and exit the editor. At this point, we have now finished all the configuration that needs to be done in AWS for CodeBuild to deploy our ReactJS app to S3.
Head back over to the CodePipeline console, locate the CodePipeline you created previously. When you open it you will see that the Source step succeeded, while the Build step failed. This is because when the CodePIpeline first ran after being created, we hadn’t setup our ‘buildspec’ file and we hadn’t granted CodeBuild the proper IAM permissions it needed.
Now that we have finished the configuration, click on the X on the right-hand side of the Build phase. This will trigger CodePipeline to retry the Build phase again. This time you should see the Build phase succeed!
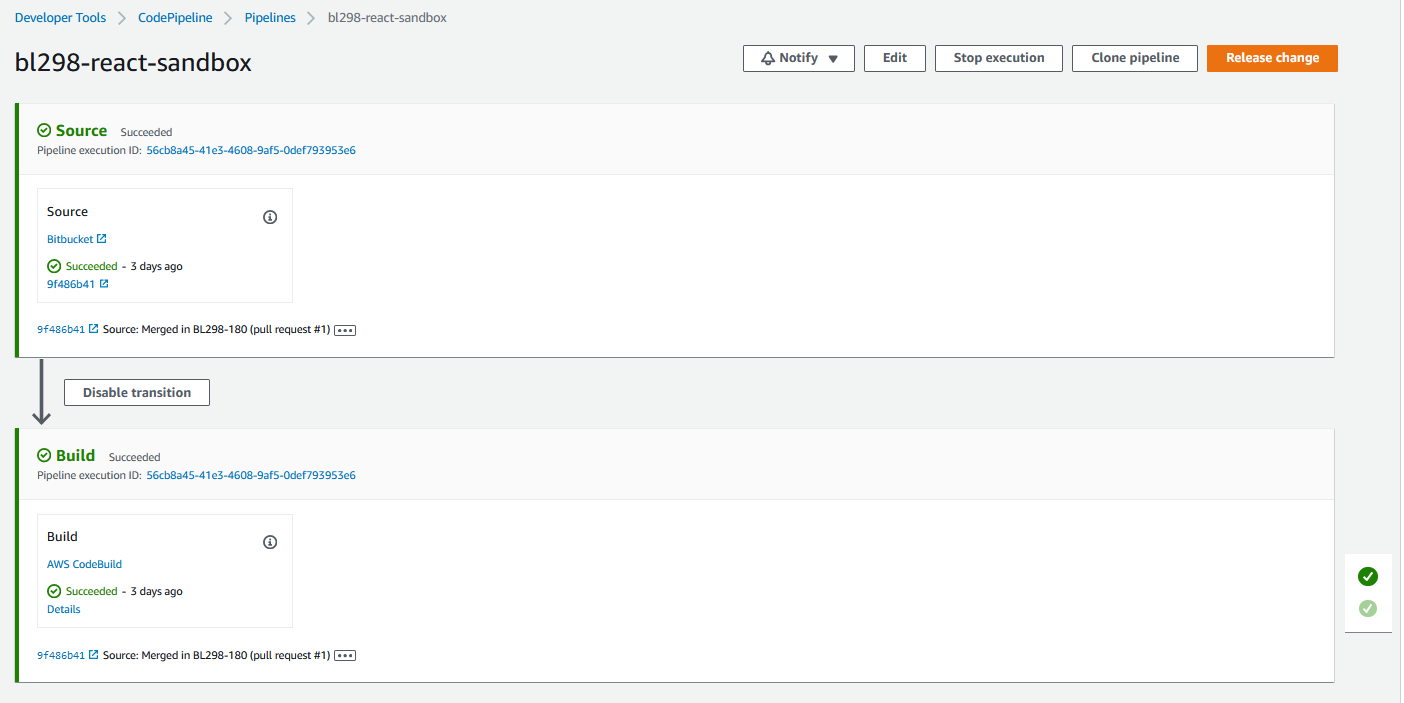
At this point we now have a fully automated build pipeline to deploy a ReactJS web app to a S3 bucket with a CloudFront CDN. To test that the web app is deployed properly, locate the URL in the “Distribution domain name” of your CloudFront distribution and plug that into your browser…and voila, you should see your app!
The final step to finishing the setup of our ReactJS app on AWS is to modify the DNS settings of the domain you want to use to access the site, this would be the same domain you entered in as the Alternate Domain Names when setting up the CloudFront Distribution.
In the DNS console for that domain add a new CNAME entry that maps either “@” (in the case you are using a top-level domain) or “<sub-domain name>” (in the case you are using a sub-domain) to the value found in the “Distribution domain name” field on the CloudFront distribution.
At this point, if you haven’t thrown yourself out of a window then I commend you on sticking it through and getting an automated build and deploy pipeline setup for a ReactJS app on AWS S3 and CloudFront!