


How to Add External JavaScript Libraries to Flowise for Custom Chatbot Tools
Artificial Intelligence Development

One significant limitation of ChatGPT is its inability to pull data from current information or third-party systems on the Internet. ChatGPT, in its default state, can only generate answers based on information as it existed at the time it was trained.
If you asked ChatGPT, “What is the weather in New York City today?”, it would not be able to answer this as it has no ability to integrate current weather data into its answers.
This is where OpenAI’s ChatGPT Plugin model comes into play.
ChatGPT Plugins are an extensibility point that allows developers to integrate ChatGPT with any type of 3rd party system or data source via a custom API. Through ChatGPT plugins, a developer can enrich the information ChatGPT has at its disposal when answering a prompt.
The centerpiece of a ChatGPT plugin is the OpenAPI specification document that accompanies it, and through which ChatGPT is able to ascertain the structure of the API and its purpose. When presented with a prompt, ChatGPT can then use the information it gleaned from a plugin’s OpenAPI specification to decide whether to call the plugin and properly structure input parameters then parse output results.
In this article, I will walk you through the steps of creating and using a ChatGPT plugin using C# and Microsoft’s ASP.NET WebAPI programming framework, specifically using .NET’s new minimal API pattern. The plugin we are going to develop is a simple weather plugin: it will return the current weather conditions for a given latitude and longitude using the free Open Meteo weather API.
The full source code for this example project can be found here.
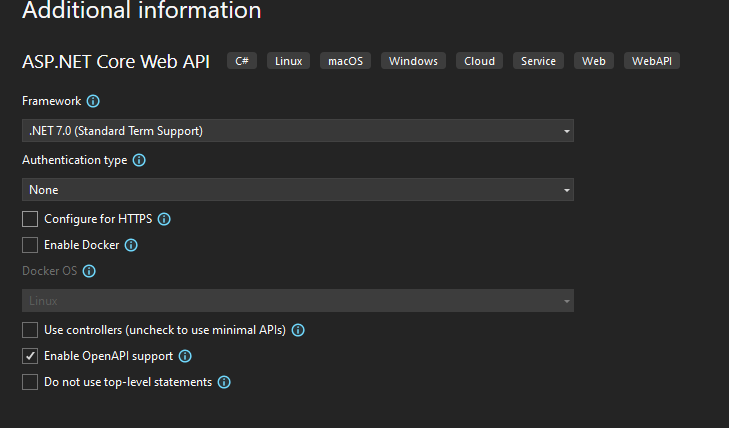
We first start by creating a new ASP.NET Core Web API project. For this example, we are going to forego the creation of Controller classes and use the .NET framework’s new minimal API design pattern. Also, it’s essential we setup the project to “Enable OpenAPI support” as we will be relying on the integration with Swagger to automatically generate the OpenAPI document that ChatGPT will need to consume our plugin.
In this example, we are simply going to need a single API endpoint “/weather”, that will receive latitude and longitude as input, and then make a call to the Open-Meteo weather endpoints to retrieve the weather forecast for the location, extract the current weather node and return that to ChatGPT. In our Program.cs file, we add the following minimal API definitions:
/// <summary>
/// Gets the weather for a latitude and longitude
/// </summary>
app.MapGet("/weather", async (double latitude, double longitude) =>
{
using (var httpClient = new HttpClient())
{
var queryParams = $"latitude={latitude}&longitude={longitude}&hourly=temperature_2m¤t_weather=true";
var url = OPEN_MATEO_BASEURL + queryParams;
var result = await httpClient.GetStringAsync(url);
var jsonDocument = JsonDocument.Parse(result);
var currentWeatherElement = jsonDocument.RootElement.GetProperty("current_weather");
return JsonSerializer.Deserialize<GetWeatherResponse>(currentWeatherElement);
}
})
.WithName("GetWeatherForecast")
.WithOpenApi(generatedOperation =>
{
generatedOperation.Description = "Gets the current weather for a city by latitude and longitude";
var parameter = generatedOperation.Parameters[0];
parameter.Description = "The latitude of the city to retrieve the current weather";
parameter = generatedOperation.Parameters[1];
parameter.Description = "The longitude of the city to retrieve the current weather";
return generatedOperation;
});
internal class GetWeatherResponse
{
public double temperature { get; set; }
public double windspeed { get; set; }
public double winddirection { get; set; }
public GetWeatherResponse() { }
public GetWeatherResponse(double temperature, double windspeed, double winddirection)
{
this.temperature = temperature;
this.windspeed = windspeed;
this.winddirection = winddirection;
}
}
Note that in the definition of our “/weather” endpoint, we call the “WithOpenAPI()” method to add metadata necessary to correctly generate the “Description” fields within the OpenAPI document for each of the input parameters our “weather” endpoint takes as an input.
Every ChatGPT plugin must expose a JSON manifest file named “ai-plugin.json”, which is hosted at the path HTTP:<domain>/.well-known/ai-plugin.json. We will be using the following JSON to describe our plugin:
{
  "schema_version": "v1",
  "name_for_human": "Weather Plugin",
  "name_for_model": "weather",
  "description_for_human": "Plugin for getting current weather information for a given city name.",
  "description_for_model": "Plugin for getting current weather information for a given city name.",
  "auth": {
    "type": "none"
  },
  "api": {
    "type": "openapi",
    "url": "http://localhost:5100/swagger/v1/swagger.yaml",
    "is_user_authenticated": false
  },
  "logo_url": "http://localhost:5100/.well-known/logo.png",
  "contact_email": "support@example.com",
  "legal_info_url": "http://www.example.com/legal"
}
Note the “description_for_model” field, that’s what ChatGPT is going to use to figure out what your plugin does. Per the OpenAI documentation, it’s essential to write this description as if it were a human reading it on the other end and not a machine! You’ll also notice that this manifest file points to where ChatGPT will be able to locate the OpenAPI specification file that it will need to understand how to use the plugin API.
In order to make the manifest JSON file be hosted as a static file by ASP.NET, we need to add the following code snippet in Program.js, right above our API method definition:
app.UseStaticFiles(new StaticFileOptions
{
    FileProvider = new PhysicalFileProvider(Path.Combine(Directory.GetCurrentDirectory(), ".well-known")),
    RequestPath = "/.well-known"
});
Arguably the most important piece of a plugin, outside of the code logic itself, is the OpenAPI documentation which describes the inputs and outputs to the plugin. Luckily for us, ASP.NET WebAPI is able to automatically generate OpenAPI-compatible Swagger documentation via the Swashbuckle package. OpenAI requires that the generated OpenAPI documentation contain certain elements that aren’t by default generated by Swashbuckle, such as the “servers” node. Further, OpenAI must be able to consume the OpenAPI documentation as a YAML file at the path indicated in the “api” element in the ai-plugin.json file.
To configure Swashbuckle to output the OpenAPI documentation in the exact way OpenAI is expecting, we add the following to the Program.cs right above the previous step:
builder.Services.AddEndpointsApiExplorer();
builder.Services.AddSwaggerGen(options =>
{
    options.SwaggerDoc("v1", new OpenApiInfo
    {
        Title = "ChatGPT.Weather",
        Version = "v1",
        Description = "A plugin that allows you to get current weather information for a given city"
    });
 });

var app = builder.Build();
app.UseCors("AllowAll");
// Configure the HTTP request pipeline.
if (app.Environment.IsDevelopment())
{
    app.UseSwagger(c=>
    {
        c.PreSerializeFilters.Add((swaggerDoc, httpReq) =>
        {
            swaggerDoc.Servers = new List<OpenApiServer> { new OpenApiServer { Url = $"{httpReq.Scheme}://{httpReq.Host.Value}" } };
        });
    });
    app.UseSwaggerUI(x=>
    {
        x.SwaggerEndpoint("/swagger/v1/swagger.yaml", "ChatGPT.Weather v1");

    });
}
The above configuration outputs an OpenAPI file, in YAML format, accessible at http://localhost:5100/swagger/v1/swagger.yaml which looks like this:
openapi: 3.0.1
info:
  title: ChatGPT.Weather
  description: A plugin that allows you to get current weather information for a given city
  version: v1
servers:
  - url: http://localhost:5100
paths:
  /weather:
    get:
      tags:
        - ChatGPT.Weather
      description: Gets the current weather for a city by latitude and longitude
      operationId: GetWeatherForecast
      parameters:
        - name: latitude
          in: query
          description: The latitude of the city to retrieve the current weather
          required: true
          style: form
          schema:
            type: number
            format: double
        - name: longitude
          in: query
          description: The longitude of the city to retrieve the current weather
          required: true
          style: form
          schema:
            type: number
            format: double
      responses:
        '200':
          description: Success
          content:
            application/json:
              schema:
                $ref: '#/components/schemas/GetWeatherResponse'
components:
  schemas:
    GetWeatherResponse:
      type: object
      properties:
        temperature:
          type: number
          format: double
        windspeed:
          type: number
          format: double
        winddirection:
          type: number
          format: double
      additionalProperties: false
The way ChatGPT plugins work is that the ChatGPT web interface directly interacts with a ChatGPT plugin’s API. Thus, to enable this integration, we need to ensure our API exposes the proper CORS headers to allow the ChatGPT web interface (hosted at https://chat.openai.com) to make calls to our hosted API endpoint, which for now will be hosted at localhost. To enable this, add the following to the Program.cs right above the previous step:
builder.Services.AddCors(options =>
{
    options.AddPolicy("AllowAll", policy =>
    {
        policy.WithOrigins("https://chat.openai.com", "http://localhost:5100").AllowAnyHeader().AllowAnyMethod();
    });
});

var app = builder.Build();
app.UseCors("AllowAll");
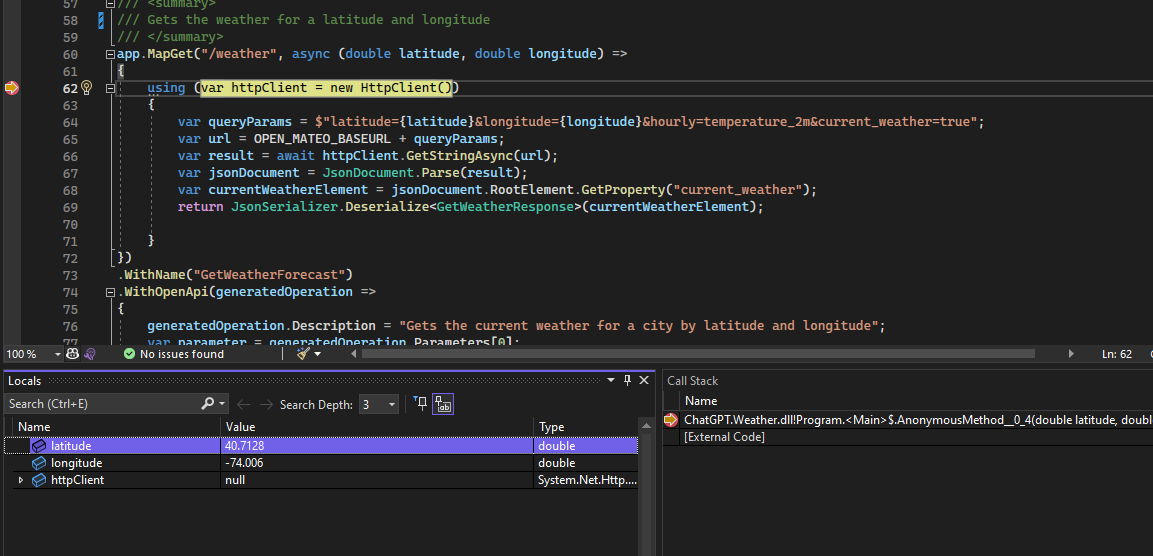
Next, we need to set up our plugin within our ChatGPT account and install it. To do this, we first launch the project in Visual Studio which hosts the API under http://localhost:5100. Set a breakpoint within the “/weather” endpoint so we can inspect the requests as they come from ChatGPT.
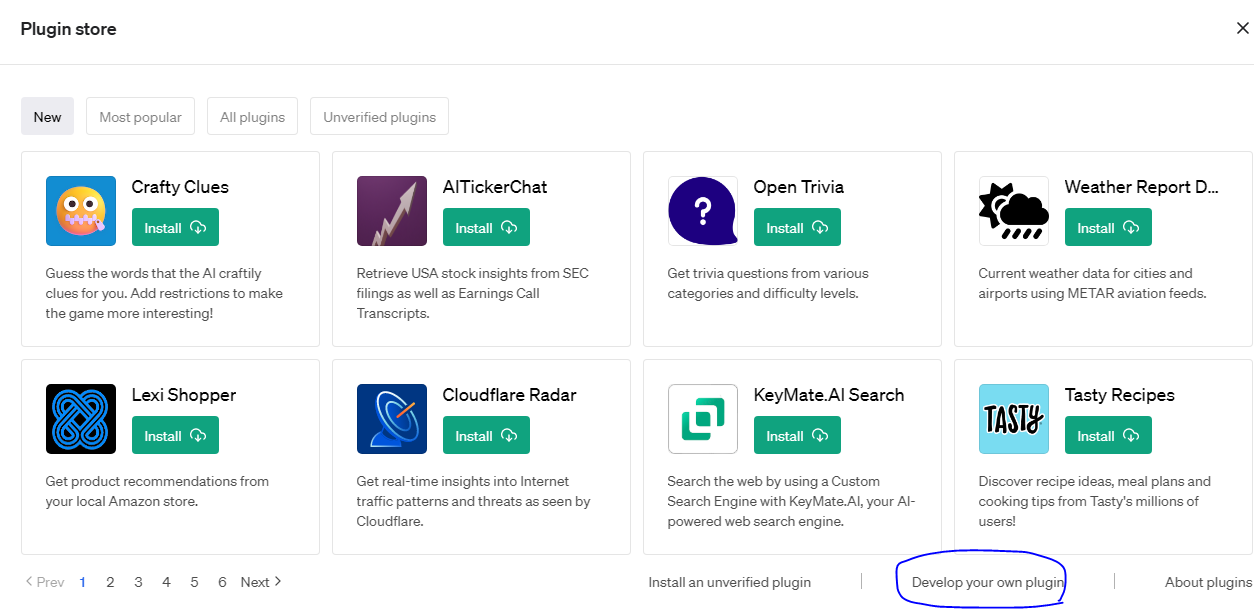
Then, we open the ChatGPT web interface and under Model, select “Plugins”, and then in the resulting Plugins dropdown, click “Plugin Store”. In the resulting screen, we select “Develop your own plugin”.
 The resulting modal asks us for the root URL for our plugin’s API. In this case, since we are hosting it on localhost, we input “http://localhost:5100”.
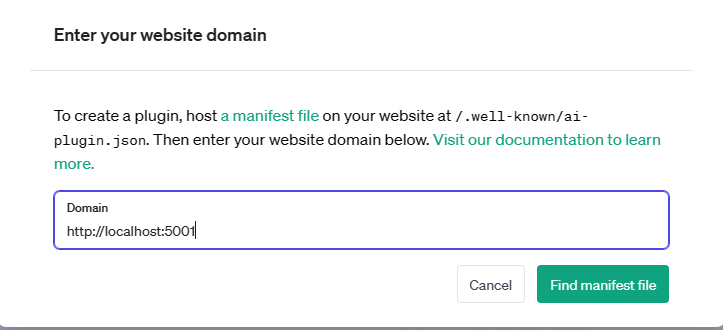
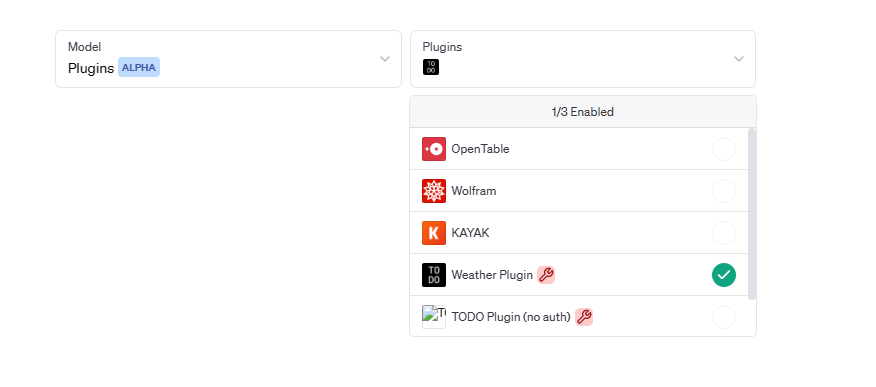
We click on “Find Manifest file”, at this point ChatGPT’s web interface will attempt to call and retrieve the “http://localhost:5100/.well-known/ai-plugin.json” manifest file. If it can retrieve the manifest file, we are prompted to install the plugin. Once the plugin is installed, we can see that the plugin is present and activated under the plugins sub-menu in the ChatGPT web interface:
 Step 7: Test and Use our New Plugin from ChatGPT
The final step is to test that our plugin works with ChatGPT by creating a prompt that should cause ChatGPT to identify our plugin and use it to help answer the prompt. Rather than just simply ask ChatGPT, “what’s the weather in New York?”, I am going to be a bit more creative in my prompt:
“Given the weather right now in New York City, what kind of clothes do you suggest I wear?”
After hitting enter in the prompt window, I can see that in my Visual Studio debug window, the breakpoint is hit from the call from ChatGPT!
As you can see, ChatGPT is smart enough to not only identify that it should use the Weather plugin to answer the prompt but also, having inspected the Weather plugin’s OpenAPI document, it understands that “New York City” needs to be translated into a longitude and latitude before calling our plugin’s /weather endpoint!
When I hit continue, I then see the full response from ChatGPT in the window where you can see in its answer that it identified and used the “Weather Plugin” to answer my prompt:
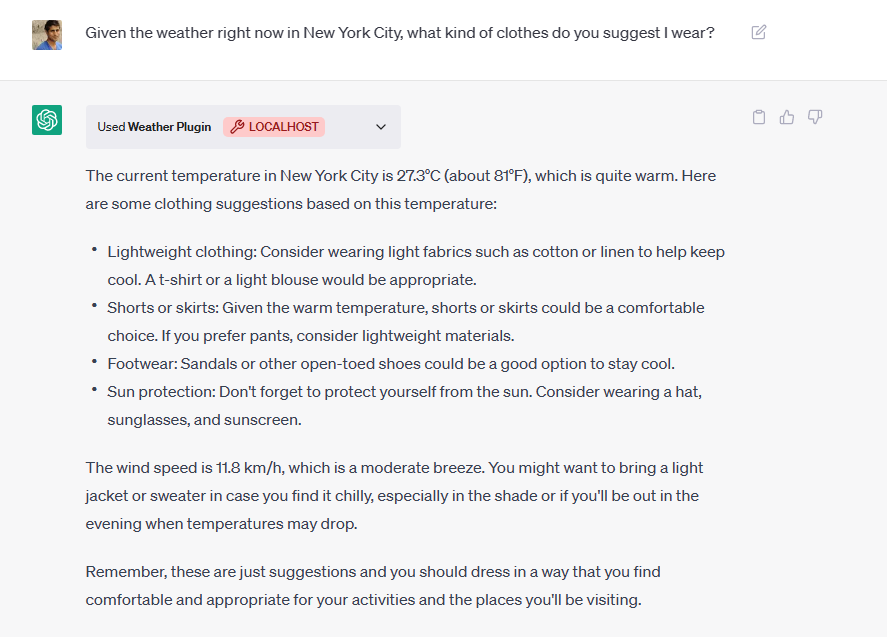
Like all things ChatGPT, the answer it provides kind of blows my mind! ChatGPT, without anything more than a YAML file, was able to understand what my plugin API does, what it expects as an input and provides as an output, and then be smart enough to realize that, based on my prompt, it not only needs to use my plugin but first translate “New York City” into a latitude/longitude prior to calling it! Excuse me while I pick up the shards of my brain off of the floor.
Surely, the computing Gods must be crazy.
The full source code for this example can be found here.
We get measurable results and stellar execution.
Have a vision–or a challenge?