


How to Add External JavaScript Libraries to Flowise for Custom Chatbot Tools
Artificial Intelligence Development

At Blue Label Labs, we build most of our projects atop AWS, and many of those projects leverage Microsoft’s open source .NET Core framework.
While Blue Label, at its heart, is a Microsoft shop, that doesn’t mean we don’t see the economic and operative advantage of using Linux to host our .NET Core applications rather than Windows.
When it comes to our continuous deployment/integration (CD/CI) pipeline for the deployment of our backend technologies to AWS, we’ve standardized upon CodePipeline and its associated CodeBuild and CodeDeploy services for managing our build pipeline and automating the deployments of code from our BitBucket repositories to AWS EC2 instances running Amazon Linux.
In this article, I will explain how to set up CodePipeline to build and deploy an ASP.NET Core Web API from source code hosted on Bitbucket to a service running on an Amazon Linux EC2 instance.
For those of you new to the AWS continuous deployment/integration (CD/CI) tooling, it is worth taking a moment to understand the 3 services we will be using in this guide.
CodeBuild is an AWS service that as the name would suggest, compiles source code and emits the output of that process in the form of a .zip or .tar archive.
The CodeDeploy service is the AWS binary deployment service that is powered by a set of YAML and shell script files.
CodeDeploy takes as an input an archive, which is often the output of a CodeBuild project, and then copies this package to a set of EC2 (or ECS instances) and then executes a set of shell scripts files to copy, install and start the application contained within said archive on the target machine.
CodePipeline is the cloud service that chains together CodeBuild and CodeDeploy projects to create a single integrated CD/CI pipeline (this is by no means a complete description of what CodePipeline can do!).
For this tutorial, we will be leveraging a CodeBuild project to compile our ASP.NET Core Web API project in the cloud that will feed into a CodeDeploy application which will deploy and run the binaries emitted from CodeBuild on the Linux machine that will be hosting our ASP.NET Core Web API upon.
Within it you will define the location for shell scripts that CodeDeploy will execute during each of the 5 phases of a CodeDeploy deployment: BeforeInstall, AfterInstall, ApplicationStart, and ApplicationStop (when and what these phases do is left as an exercise to the astute reader).
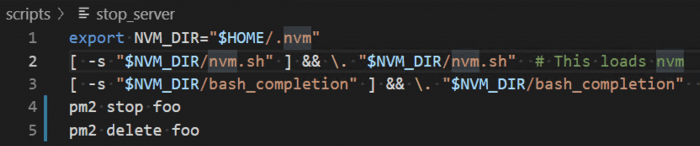
These shell scripts we store in a /scripts folder under the root and will execute at the path on the file system listed in the destination parameter.
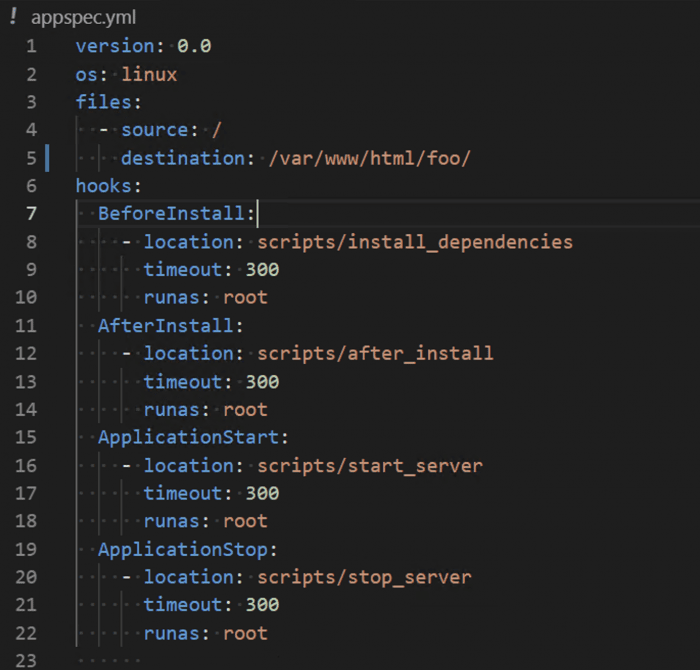

This ApplicationStop command will be run by CodeDeploy before each subsequent deployment after the first.
One of the most common failures of a CodeDeploy deployment happen in the execution of the ApplicationStop script prior to the deployment of a new build, but this can be rectified by manually overriding the ApplicationStop method outlined here.
In a baffling example of poor UX, while the AWS CodePipeline wizard allows you to create a CodeBuild project inline, it does not allow you to do the same for CodeDeploy.
So here we are, setting up a CodeDeploy application as a prerequisite rather than as part of the normal flow of the tutorial. Setting up the CodeDeploy application and deployment groups is left as an exercise for the reader.
Phew, now that we got all that out of the way we are ready to begin the process of setting up the CodePipeline that we will use to build and deploy our ASP.NET Core Web API.
In the AWS management console, create a new CodePipeline project and set up its basic parameters as normal.
Generally, we set up 2 independent pipelines, one for testing and the other for production and link each to a different branch in the origin repo.
This step, as the name would imply, leverages a hosted build environment to compile your source code into the executables that will eventually be deployed to the Linux machine.
In setting up the CodeBuild project, you will be asked to select the build environment to use; for this example choose a Windows base image like “/aws/codebuild/windows-base:2.0”.
The buildspec is a YAML formatted file that contains the instructions used by CodeBuild to compile your code.
For this example, this is the CodeBuild buildspec file we will use:
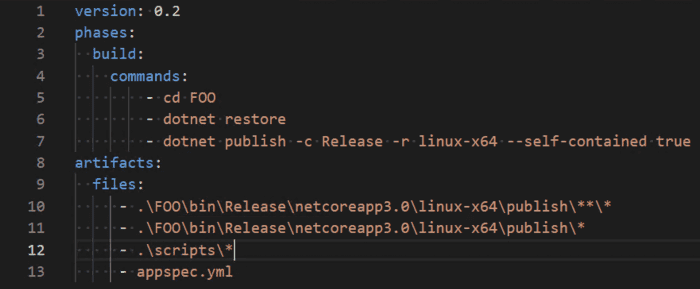
The root directory from which they execute is the root directory of the repository we are building. Since we are looking to deploy these binaries on an Amazon Linux instance, hence we instruct the compiler to emit binaries for Linux using the -r flag.
Again this is a simple file notation rooted in the source directory of the repository.
The artifacts serve as the main output of the CodeBuild phase and will be used as input to the final phase of our pipeline…
Once the pipeline is created, then as the English would say: Robert is your mother’s brother (translation: you are done).
You can test whether your pipeline is working by adding a small change into your source tree.
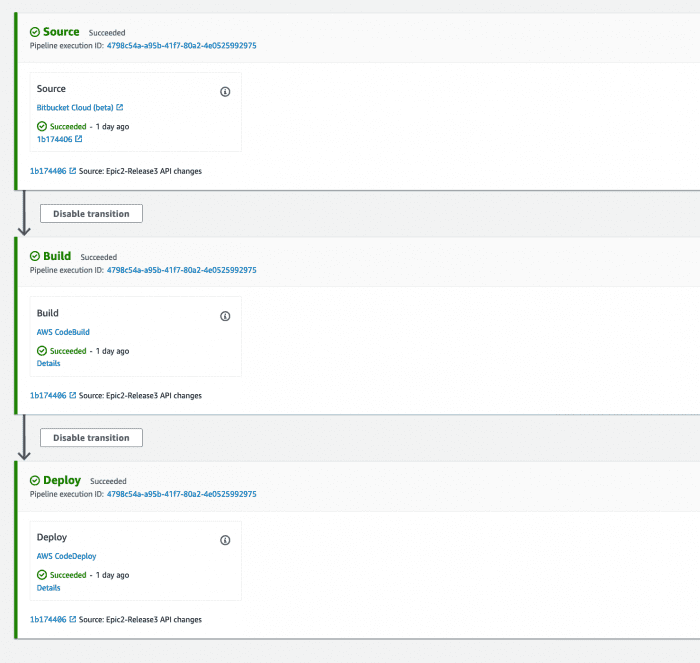
Upon pushing the change, you will immediately see your pipeline start to run in the AWS console.
If all 3 phases complete successfully (as will be evidenced by a screen that looks like the below image) then you have succeeded in your quest to use CodePipeline to build a CD/CI pipeline for a ASP.NET Core Web API project: