


How to Add External JavaScript Libraries to Flowise for Custom Chatbot Tools
Artificial Intelligence Development

Smart Contracts refer to immutable pieces of code that live on the Ethereum blockchain.
Once you deploy a contract, you cannot update it to fix a security breach – so knowing how to examine and identify security breaches in your contract source code prior to deploying it to the blockchain is the first step to securing your smart contract.
In particular, one of the easiest ways to introduce a security vulnerability into your contract is through the improper use of visibility modifiers.
In this article, instead of just talking about abstract concepts, I will walk you through the process of building a Content Access Contract, testing it, and examining security vulnerabilities introduced by using the wrong visibility modifiers so as to provide you with hands-on experience.
The Content Access Contract is a smart contract aimed at giving a hackathon platform learners access to course materials.
To understand the concepts discussed in this article, you will need an intermediate knowledge of Solidity, Remix IDE, and Ganache.

In this tutorial, we will use Remix IDE to build a smart contract to give students access to hackathon course materials once they pay a certain fee to a smart contract.
Suppose that we’d like to build a Web3 hackathon platform that requires learners to use crypto wallets for account creation and payment.
In a nutshell, our platform will enable learners to create a profile using their crypto wallets, but they will need to pay a certain fee to generate a random 9-digits authorization code, which will be the ticket for accessing the hackathon course content. The course materials are stored off-chain, so our platform communicates with the Ethereum mainnet just to verify payments.
Our contract will maintain a database of all the authorization codes and their associated public addresses so as to grant subscribers access to the course materials. When a learner tries to access our platform course content, the platform uses the learner’s public Ethereum wallet address and checks if it has an authorization code in our blockchain-based backend. If the platform sees a corresponding authorization code, it then gives the learner access to the course materials.
To build the content access contract using Remix IDE:

// SPDX-License-Identifier: MIT
pragma solidity ^0.8.0;

/***
*@title A Contract for Giving Learners Authorization Code
*@author Said Habou Adi
*@notice You can use this contract to take advantages of Ethereum Blockchain to give access to course content.
*@dev This contract's main public function takes an input as an argument and generate authorization code.
*/

contract ContentAccess {

    uint[] collectionOfAuthCodes;

    ///@dev Public Keyword helps the compiler generate a function that returns mappings' values.
    mapping(uint => address) public authCodeOwner;
    mapping(address => uint) public authCodeOfLearner;
    mapping(address => uint) authCodeCount;

    uint authCodePrice = 2 * (10 ** 18);

    event NewAuthCodeIsAdded(uint cryptoCode);


        ///@notice Changes the price of authorization codes creation.
        ///@dev Takes a wei unit as argument to change the price for generating authorization codes.
    function setauthCodePrice(uint _price) external {
        authCodePrice = _price;
    }

        ///@param inputKeccak The input to be used to generate authorizationcodes
        ///@return Random 9-digits numbers.
    function generateAuthCode(string memory inputKeccak) public view returns (uint) {
        uint hash = uint(keccak256(abi.encodePacked(inputKeccak, msg.sender, block.timestamp)));
        return hash % (10 ** 9);
    }

        ///@notice Takes random numbers and add it to the array.
    function addAuthCode(uint _hashmodulus) public {
        collectionOfAuthCodes.push(_hashmodulus);
        authCodeOwner[_hashmodulus] = msg.sender;
        authCodeOfLearner[msg.sender] = _hashmodulus;
        authCodeCount[msg.sender]++;
        emit NewAuthCodeIsAdded(_hashmodulus);
    }

        ///@notice Creates an authorization code
        ///@dev Takes an input, generate 9-digits number and add it to the array
        ///@param input to be used as an argument by invoked functions
    function createAuthCode(string memory input) external payable {
        require(authCodeCount[msg.sender] == 0);
        require(msg.value == authCodePrice);
       uint randNumber = generateAuthCode(input);
       addAuthCode(randNumber);
    }

        ///@notice Returns the number of enrolled learners
        ///@dev Returns a number.
        ///@return Number of student with authorization code.
    function getNumberOflearners() external view returns (uint) {
        return collectionOfAuthCodes.length;
    }

        ///@notice Function caller receives the money stored in the contract.
    function withdraw() external {
         address payable moneyReceiver = payable(msg.sender);
        moneyReceiver.transfer(address(this).balance);
    }

        ///@notice Returns all authorization codes.
        ///@dev Returns authorization code stored in the collectionOfAuthCodes array.
        ///@return Authorization codes.
    function getCollectionOfAuthCodes() external view returns(uint[] memory) {
        return collectionOfAuthCodes;
    }
}
The first line of our code specifies that the source code is licensed under MIT. Machine-readable license specifiers are important for open-source project development.
The next line shows the Solidity version the source code is written for and tells the compiler how to treat the source code.
The next lines show special comments that provide brief and concise explanations about the contract, its functions, and return variables. This special comment is named NatSpec, which stands for Ethereum Natural Language Specification Format.
The contract statement marks the beginning of our Solidity code.
Following the contract statement is an array of type uint named collectionOfAuthCodes, which stores all the authorization codes in our contract. In programming, you use an array when you want to store a collection of a specific data type consecutively.
The next lines introduce a group of state variables of type mapping.
Mapping variables are complex data types with a key-value pair for storing and checking data. The public modifiers attached to our first two mapping variables (authCodeOwner and authCodeOfLearner) will generate functions that give access to their current values. Without this keyword, you will need to define your own getters to have access to their values.
The authCodeOwner mapping variable is used for setting ownership of an authorization code created. The authCodeOfLearner mapping is used to know the authorization code of a specific Ethereum wallet connected to our platform.
As for the authCodeCount mapping, it will be used to determine how many times a specific Ethereum wallet calls our createAuthCode function. It is useful for limiting function calls.
The authCodePrice state variable of type uint stores the wei fee of creating an authorization code. In addition to ether, Ethereum features gwei and wei denominations. I opted for wei denomination as it helps us update authCodePrice’s value with setAuthCodePrice() function. The 2^18 wei in our code corresponds to 2 ETH, which is a hard pill to swallow, but for testing sake, it’s acceptable as it helps us know much money has been debited from a caller’s account.
A realistic fee would be 0.1 to 0.2 ETH, but Ethereum does not recognize decimal numbers. So it makes sense for us that the best workaround solution is to use wei denomination for decimal numbers’ properties. In order to get 0.2 ETH in terms of wei, we just need to divide the wei denomination by 10, which means to remove one zero. Thus, the 0.2 ETH in terms of wei is 2^17 wei.
The next line is an event statement that will be called in the last line of addAuthCode() function. In Solidity, event statements notify the frontend about state changes on the blockchain. You declare a solidity event as follows:
event EventName(parameter1...)
Following the event statement is a list of function declarations. You declare functions as follows:
function nameOfFunction(<parameter types>) [internal|external] [pure|view|payable] [returns (<return types>)] {/* ... */}
The first public function named setAuthCodePrice() takes a uint variable and enables you to update the authCodePrice variable that represents the fee of creating an authorization code.
The next three functions are used together to generate authorization codes:
The generateAuthCode() generates an authorization code of 9-digits integers by using the Ethereum hash function called keccak256 and type casting the hash as uint. A hash function takes an input and then generates a random 256-bit hexadecimal number. Any change in the input will also change the hash in turn. This is why you need to pack the parameter before invoking keccak256, which requires a single parameter of type bytes. For example
keccak256(abi.encodePacked(parameters))
Given the fact that a hash function always generates the same hash for the same input, two different callers will get the same authorization code if they enter the same input. To fix this, we pass Solidity special variables as additional arguments to the hash function.
In our code, we passed the single parameter of generateAuthCode() as an argument to the keccak256 function in addition to msg.sender, and block.timestamp. In Solidity, msg.sender, is a special variable that refers to the address of the person (or smart contract) that calls a specific function, and block.timestamp provides updated information about the blockchain.
The addAuthCode() function takes the authorization code generated by the previous function, adds it to our array, and sets the authorization code owner to msg.sender, the caller.
The createAuthCode() payable function charges users and contracts for generating authorization codes. Its first required statement ensures this function is executed one time per account. Its second required statement debits the account of the caller and credits our contract. It then invokes the previous functions as follows: generateAuthCode() and addAuthCode().
The getNumberOflearners() function returns the number of learners with an authorization code.
The withdraw() public function transfers the money stored in the contract to the caller.
The getCollectionOfAuthCodes() returns all authorization codes.
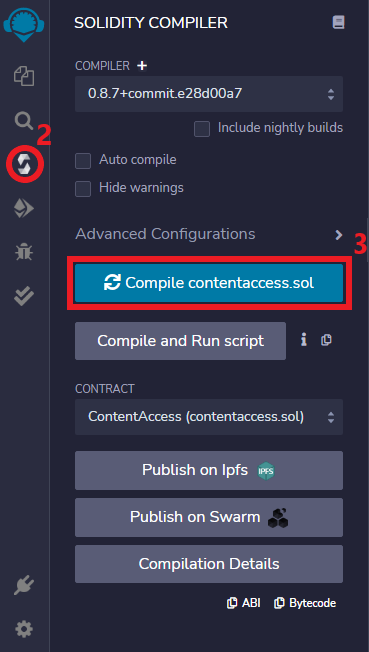
An EVM (Ethereum Virtual Machine) only reads EVM bytecodes – after completing the previous tutorial, you must compile the contract to generate bytecodes to be sent to the Ethereum network as a deployment transaction to be interpreted by the EVM.
A transaction is a request for code execution and the blockchain contracts’ codes are only executed when an external account calls their functions.
The following sections will cover compiling and deploying a smart contract.
To compile a contract:
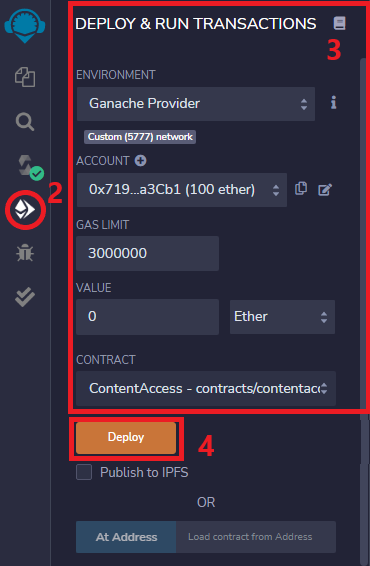
Before deploying your contract, make sure you’ve installed the blockchain simulator Ganache which will allow you to test your smart contracts.
To deploy a contract:

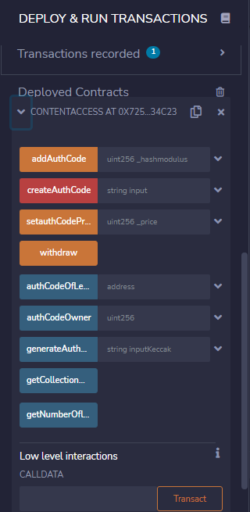
Once you build a smart contract, the best way of auditing your contract is to test and examine its public and external functions.
This is critical because any other contract or user on the blockchain can interact with yours by using an interface or by calling your exposed functions. The scenario for our test focuses on checking the security of our smart contract.
Here are the test cases:
ID: TC_01
Title: Check authorization code creation by passing an argument to createAuthCode().
Test Steps:
The result: The transaction creates an authorization code for the caller, the caller’s account is debited and the contract account is credited.
ID: TC_02
Title: Check authorization code creation by passing an argument to addAuthCode().
Test Steps:
The result: The transaction creates an additional authorization code for the caller, but the caller’s account is not debited and neither is the contract account credited.
After running these tests, you would see two authorization codes for one account. To verify this, call the authCodeOwner() and authCodeOfLearner() functions generated by the compiler due to the public keywords attached to the mapping variables named authCodeOwner and authCodeOfLearner.
What you’ll notice is that the behavior of our contract is not normal given the fact that our contract should enable only one authorization code per public address. In addition, it should debit accounts creating authorization codes while crediting our contract’s account.
So why do we have this result?
Well, our contract has three functions that work together to generate authorization codes where two of them act as helper functions. We can’t expose them because people may bypass the condition statements implemented in the main function named createAuthCode() that verifies a caller both has the money to generate authorization code and doesn’t have an existing one.
Given the fact that the addAuthCode() is public, a hacker could type random numbers as if it was generated by the generateAuthCode function. They could then set the ownership of the fake authorization code to msg.sender and then slip it into our array.
Thus, the address would have two codes which mean our contract will not act as expected.
To fix these kinds of breaches, we only need to use private visibility modifiers.
As for the following functions, we can’t change their visibility modifiers because we interact with functions that are either public or external. Since we can’t change their visibility, we need to restrict access for the following reasons:
The withdraw() function withdraws the money stored in the contract. Allowing someone else to call it would make it simple for someone to steal from the platform.
The setauthCodePrice() is also an important function – our platform would cease to work if a wrecker replaced the current price with a higher price.
Both getNumberOflearners() and getCollectionOfAuthCodes() are functions that provide information on statistics and as such, should be only called by the real owner.
Though using appropriate visibility modifiers can help you secure smart contracts, they have some limits. In the next article, I will provide you with more details on modifiers and restrictions to use so as to fix the vulnerabilities of our contract.
Visibility modifiers play an important role in smart contract security. Using the wrong visibility modifiers can introduce vulnerabilities that could end up costing you a lot of money. As you’ve seen in this article, understanding how visibility modifiers work and applying the right one to your smart contract’s variables and methods is crticial to building secure dApps. To learn more about how Solidity visibility modifiers work please check out our detailed breakdown.