


How to Add External JavaScript Libraries to Flowise for Custom Chatbot Tools
Artificial Intelligence Development


This Part 3 of a 3-part series that walks through the steps of using Amazon CodePipeline and CodeDeploy to automate the deployment of a Node based web service to an EC2 environment. Before continuing on this guide, please make sure to review Part I and Part II
Finally, we are now ready to actually setup the AWS CodePipeline and AWS CodeDeploy applications that will be used to automate the CD/CI pipeline deploy of a Node based web service to our EC2 sandbox environment. In this post, I will walk through how to use the AWS console to configure the CodeDeploy application and CodePipeline details to make this happen.
At a high level, we will use a simple 2-step CodePipeline setup for this automation. The first step, aka the Source step, will read any new commits out of the Bitbucket repository and package them up for the second step, the Deploy step run by CodeDeploy. Given we are deploying a Node based web service, there is no Build step necessary as there is no need to compile down the project into a streamlined Javascript/HTML/CSS package. We simply just need to copy and deploy.
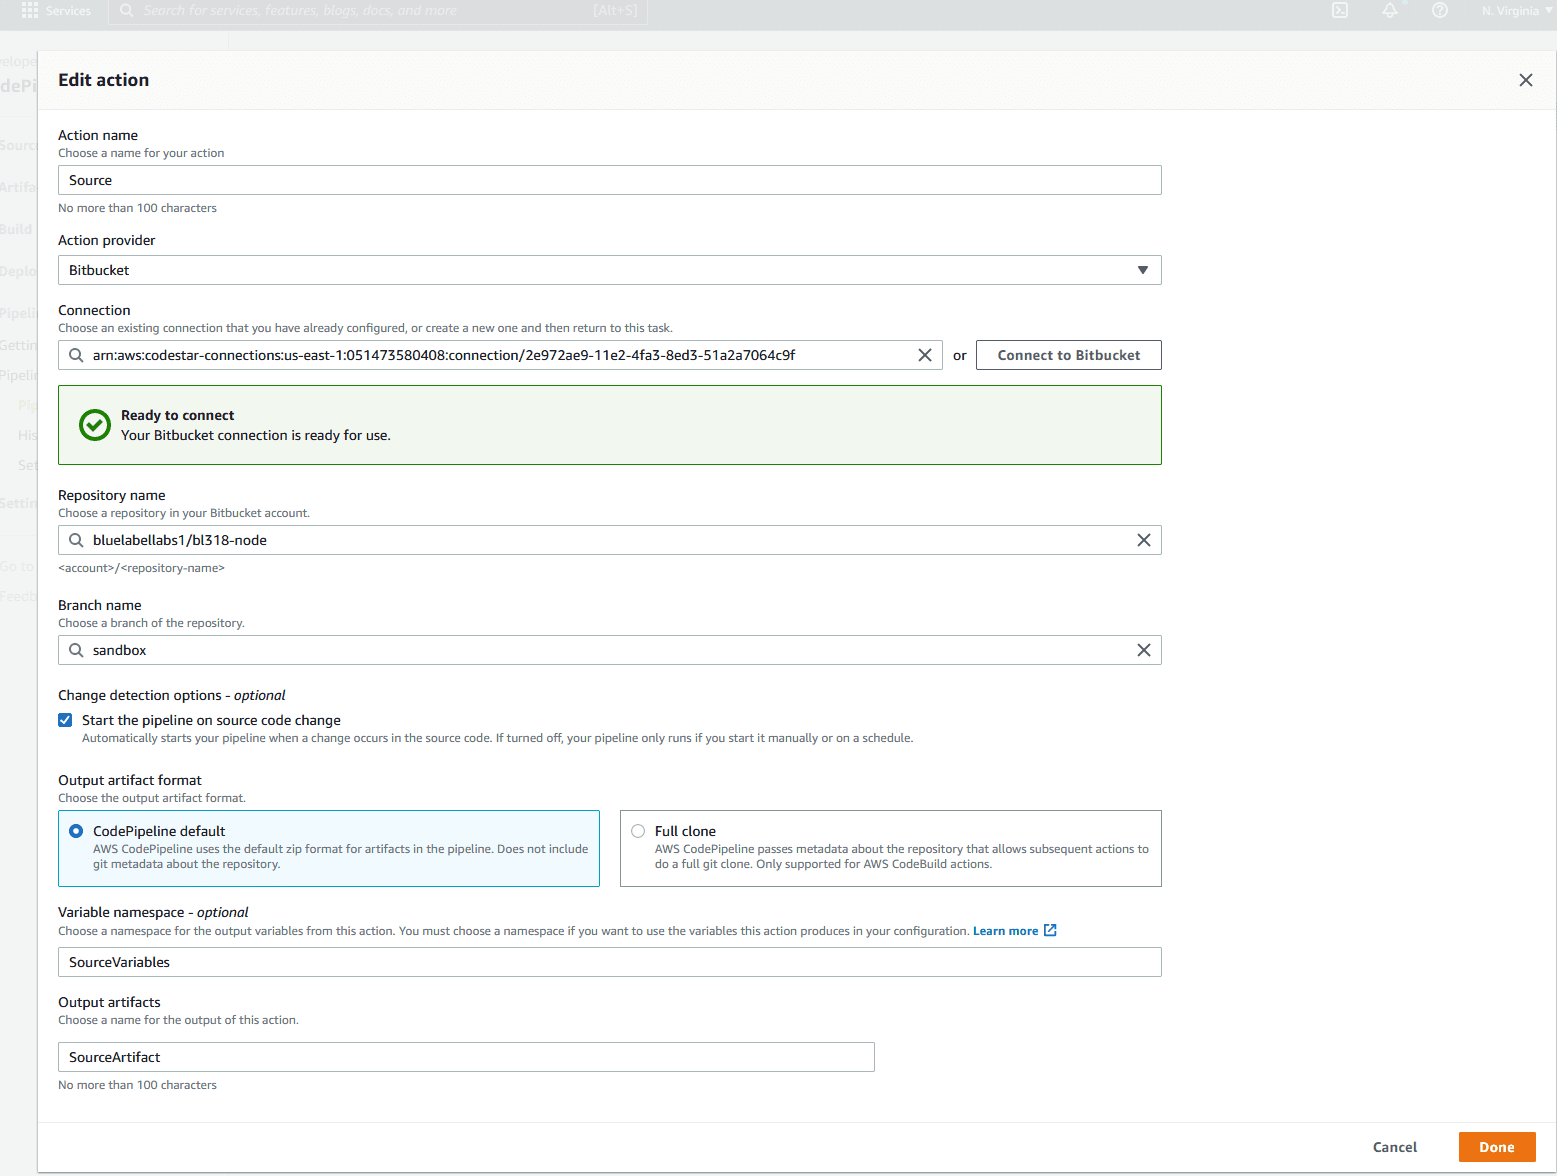
The first thing we need to do is setup the CodeDeploy application that will be responsible for taking the contents of our bitbucket repository and deploying it to the EC2 machine.
CodeDeploy uses “Deployment Groups” as a mechanism for grouping together resources that are meant to be the target of a CodeDeploy deployment. In our case, we will only have 1 deployment group that will include the EC2 machine we had setup in Part I. To setup the deployment group follow these steps:
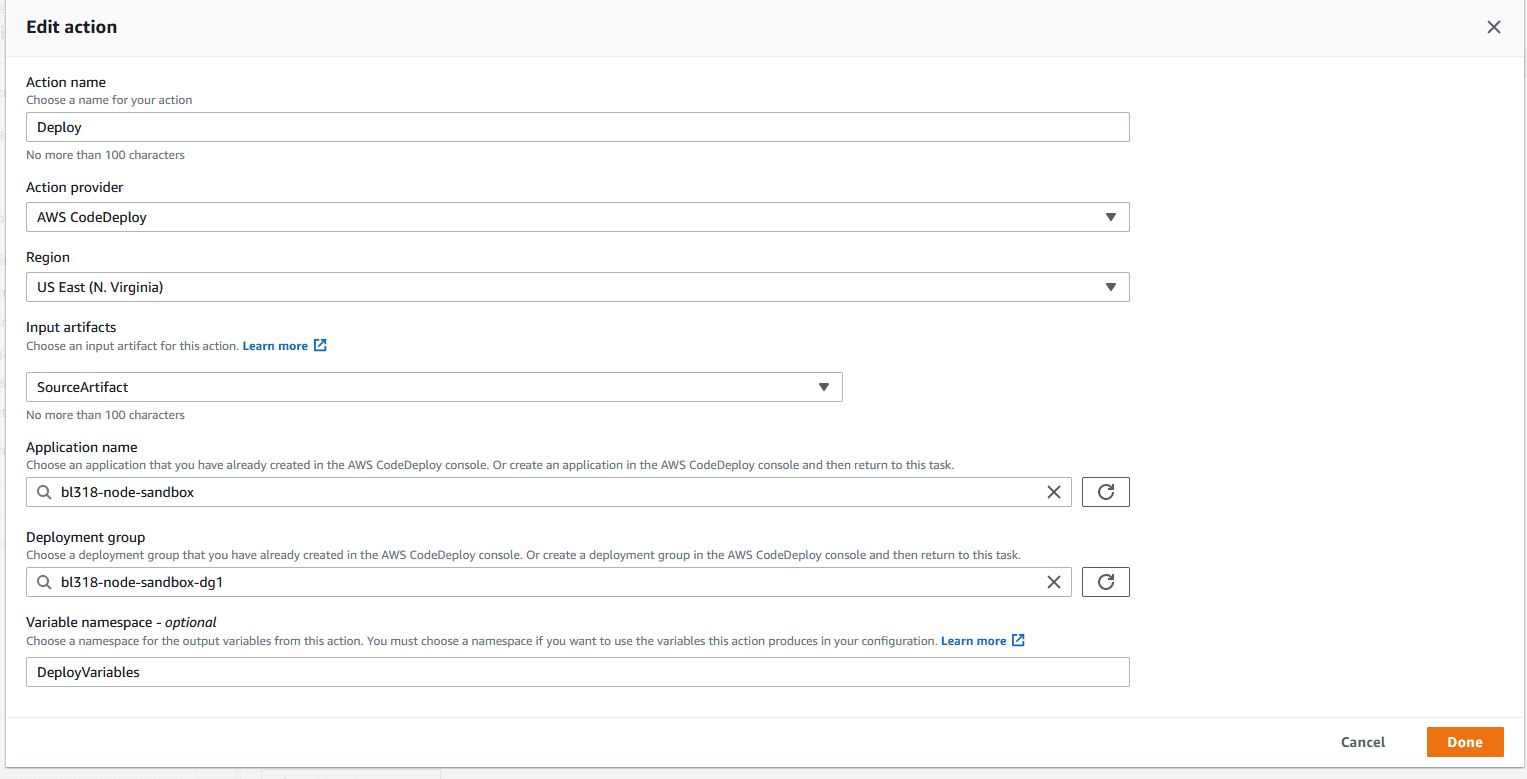
Finally, the last step of this belabored process is the creation of the CodePipeline configuration which will string together everything we have done thus far and bring to life our glorious CI/CD deployment pipeline. To create the CodePipeline, follow these steps:
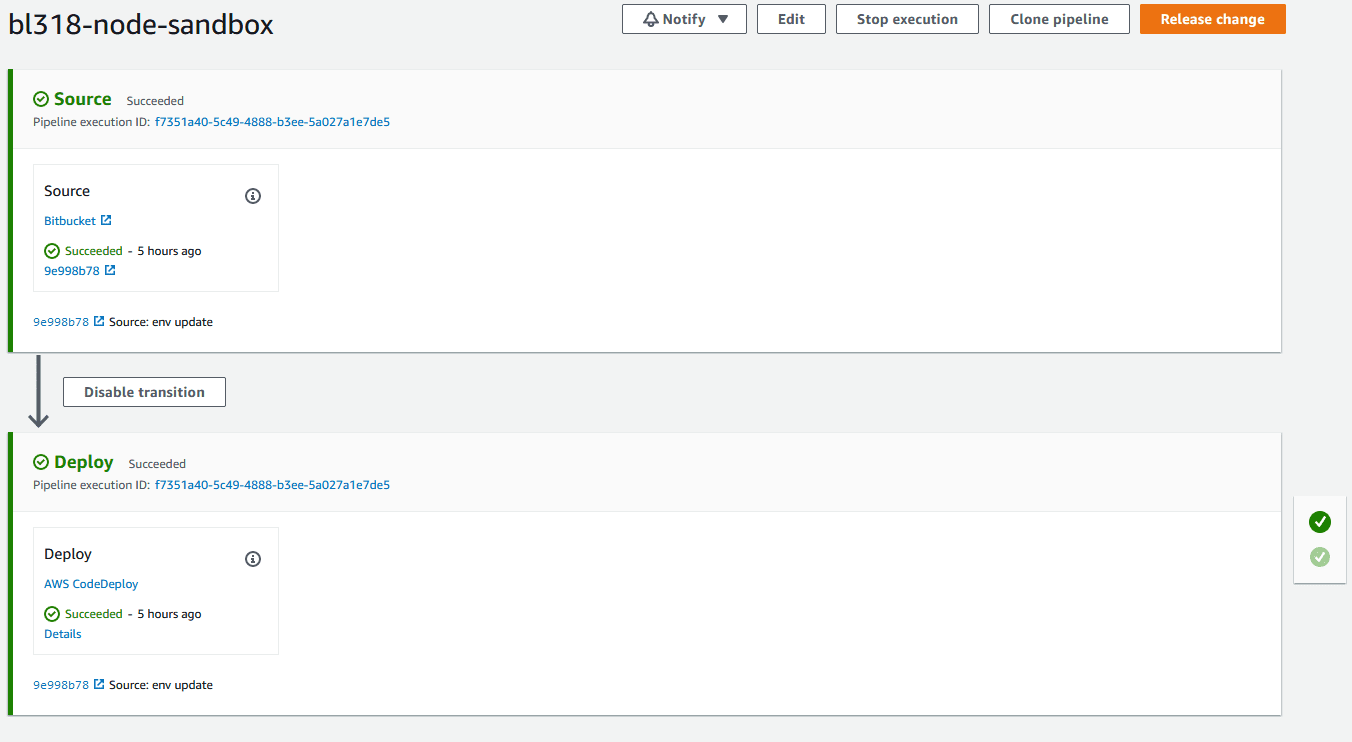
At this point, the CodePipeline is setup and should start running right away! If everything has been done correctly up until this point, you should see that both the Source and Deploy phases report a “successful” status. The CodePipeline should look something like the below upon successful completion:
Much like my attempts at courting the fairer sex in high school, in setting up CodePipeline and CodeDeploy you should be ready to deal with disappointment, rejection and abject failure. There are any number of ways that the setup of the components can fail. However, luckily for most issues that occur in CodeDeploy the AWS console provides a very clean output of the CodeDeploy process and steps. It is relatively easy to identify what caused a CodeDeploy deployment to fail.
When a CodeDeploy deployment fails, you can drill down under the Deployments tab of the Application to identify which phase the failure occurred. For example in the following screenshot we see that the CodeDeploy deployment failed during the ApplicationStop phase.
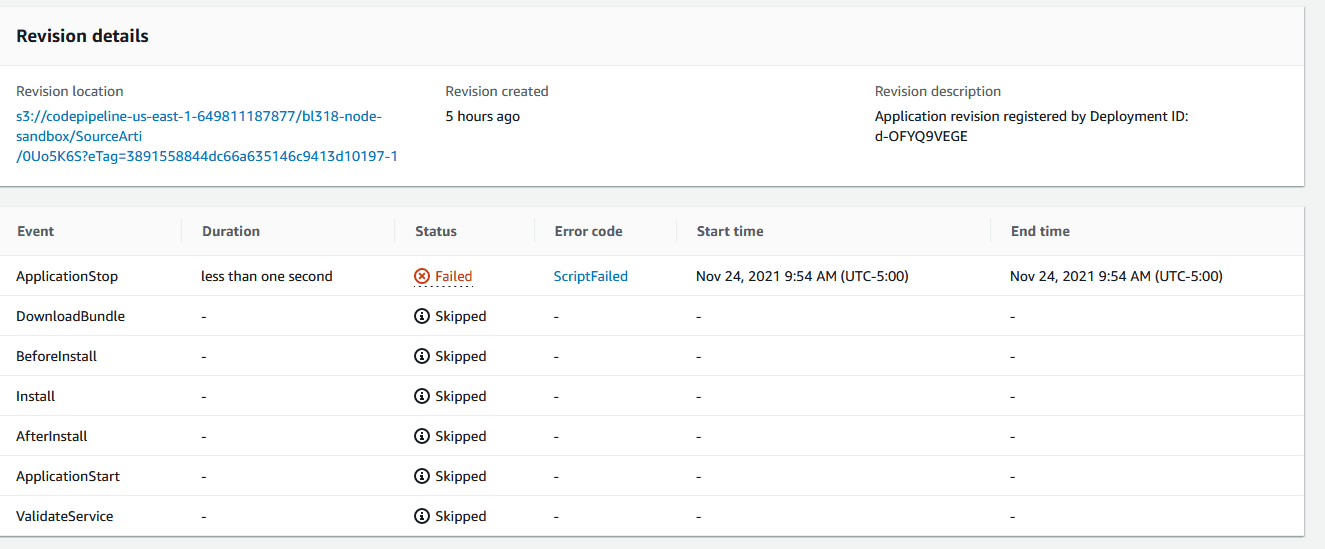 If you click on ScriptFailed, it will open up a window displaying the console output from the CodeDeploy script that ran during the “ApplicationStop” phase. If you recall from Part II, that script was named “stop_server”.
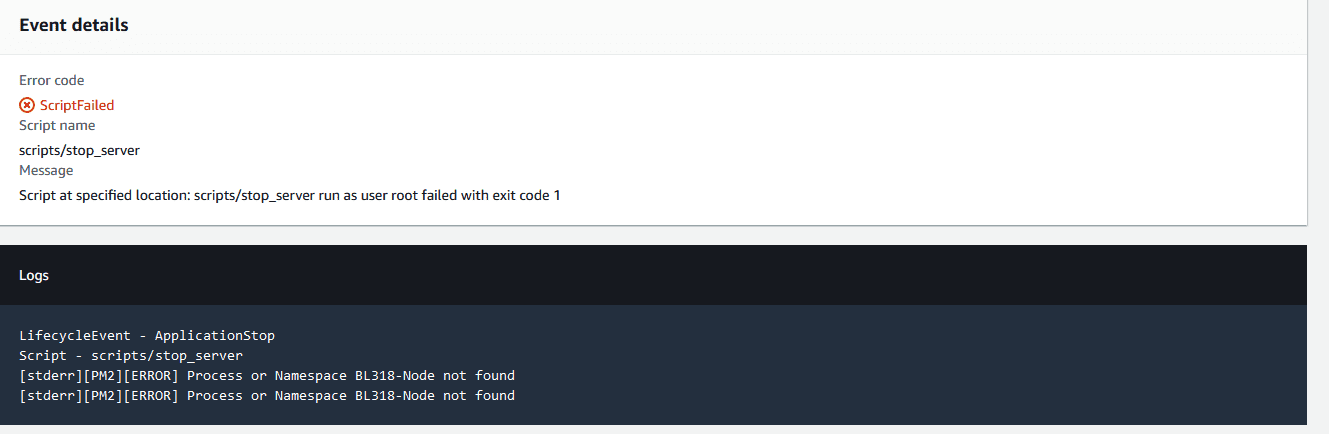 Here we see that the “stop_server” script failed as it attempted to stop a pm2 process named “BL318-Node” that doesn’t exist. This particular error is an annoying one you should be prepared to deal with and which has a very simple workaround for outlined here.
In the following example, the error is shown to have been thrown during the “AfterInstall” phase.
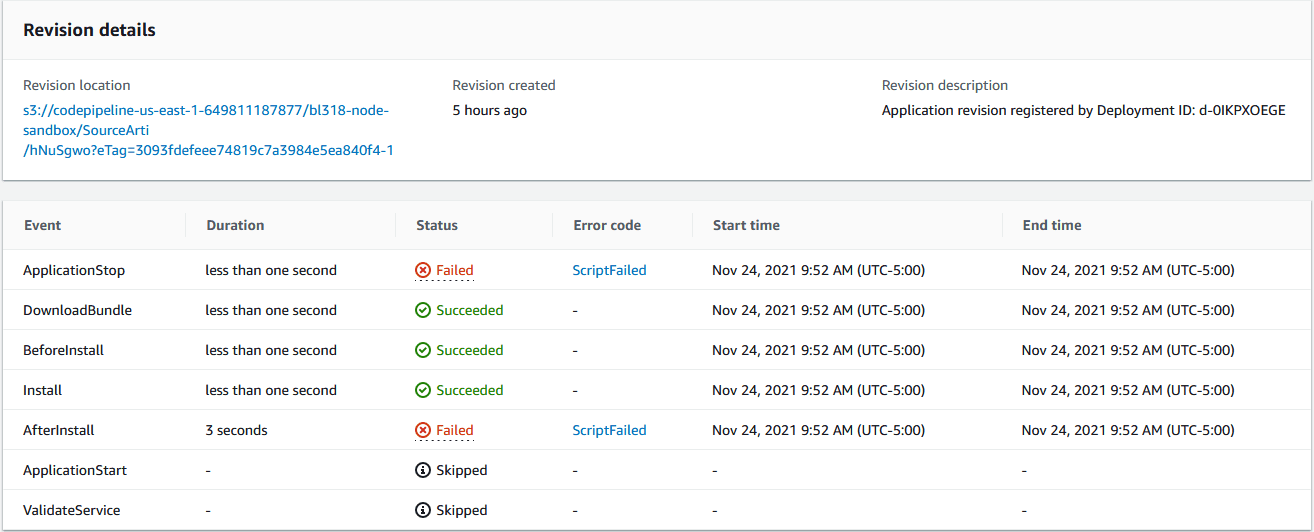
Opening up the console output, we see the following output generated from the “after_install” script:

In the above console output, it looks like the after_install script failed due to the migrations folder missing, doh! The fix for that was to commit the missing migrations into our source tree, after which the pipeline was able to run successfully.
If the CodePipeline reports that both the Source and Deploy phases are successful. The next step to ensure that everything was deployed properly is to check the status of the deployed application on the EC2 machine.
Finally, we’ve reached the end of our triology. Getting CodeDeploy/CodePipeline working is a bit of a chore, but once you get passed the initial setup steps, the combination of these two services prove themselves worthy and very quickly will end up reaping dividends gained through the automation of a CD/CI deployment.
We are looking for exceptional people to join our exceptional team and build great things together.
See Our Current Open Positions