At Blue Label Labs, we have standardized our mobile app development to use React Native for both Android and iOS builds.
As part of our build workflow, we leverage Bitrise as our preferred CI/CD automation tool that automatically creates and uploads builds to Apple App Store Connect for every one of the projects we are working on.
Bitrise is an excellent CD/CI tool that is designed for mobile app development, it has enough flexibility to adapt to any development team workflow and has enough out of box connectors that make integrations with common tools and 3rd party providers like Apple App Store Connect, Slack and NPM a breeze.
As powerful and great Bitrise is, getting it to build a React Native project and upload it to Apple App Store connect can be a little tricky the first time around.
In this post, I will walk you through all the steps required to setup a completely automated CD/CI pipeline that will build the iOS version of a React Native app, sign it, and then upload it to Apple App Store Connect automatically.
Pre-requisites:
- An Apple App Store Connect account with an app listing already created for the app in question.
- An Apple developer account within the organization that can be used by Bitrise to upload the build. You will need the username/password/application password for this account. Do not use your own personal Apple developer account as you will need to input these credentials into Bitrise. Make sure this account has at least Developer level permissions in the Apple App Store Connect account.
- An App Store distribution certificate along with a App Store Distribution Provisioning profile that is linked to that Certificate, both of which henceforth are referred to as the Distrubtion Certificate and Distribution Profile.
- A React Native project with targets setup for iOS. Also, a git repo with your source code, ideally hosted on something like Bitbucket and/or Github.
- You will need the Developer ID of the Apple account you are going to be building this app against. Follow these instructions to find it.
1) Prepare the XCode Project for Bitrise
- In your XCode project, make sure to disable automated code signing. Second, make sure to specify in the provisioning profile dropbox the Distribution Profile that we are using. Commit and push these changes to the git repo.
- Note down the relative path under your repo root to the Info.plist file, you will need this in a bit.
- Note down the name of the Scheme you would like to build the iOS app binary from.
2) Create a new App in the Bitrise Web UI
- In Bitrise, click on “Create new app”
- Enter in the relevant details of your project, including:
- The url to your source code repo.
- Setup the repository access to be “Automatic”, you can select “No, auto-add SSH key” when asked “Do you need to use an additional private repository?”
- Input the name of the branch you want to build from.
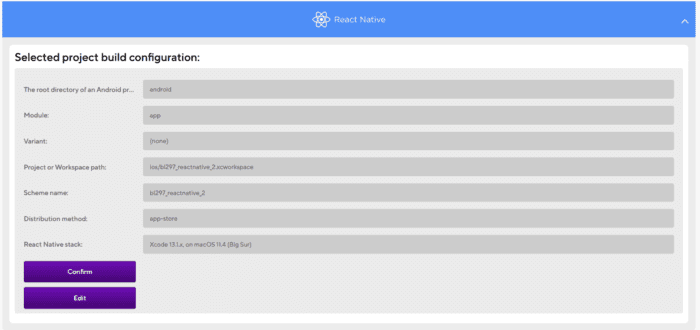
- At this point, Bitrise will start its auto-detection scripts to configure the app within Bitrise based off what it sees in the source repo. The project scanner should detect and configure the project as a “React Native” project.
- It will in the project build configuration prompt you to input or accept what it has detected for
- As part of the auto-configuration of Bitrise, it should detect that the app is a “React Native” project and it will prompt you to accept or enter values for the following:
- The root directory of an Android project: “android”
- Module: “app”
- Variant: <leave blank>
- Project or Workspace Path: ensure this is the correct relative path to the XCode workspace file, it should be something like “ios/<project name>.xcworkspace”
- Select Scheme Name: select the name of the Scheme that matches the Scheme you noted in the XCode configuration step.
- Select Distribution Method: “app-store”
- You are then presented with the final build configuration, press “Confirm” and Bitrise will configure the project for you.
- You can choose to add an App Icon, or skip.
- Finally, in the webhook setup choose to automatically add a webhook to the Bitrise/Github repository, this will be needed if you want to automatically trigger builds whenever a new push is made to the repo.
- Once done the project is configured and we can move onto the next step. Bitrise will automatically attempt to start a build, however you need to Abort this build because we haven’t setup the Bitrise workflow yet.
3) Setup the Bitrise workflow
- Open up the build project you just created, click on “Workflow”.
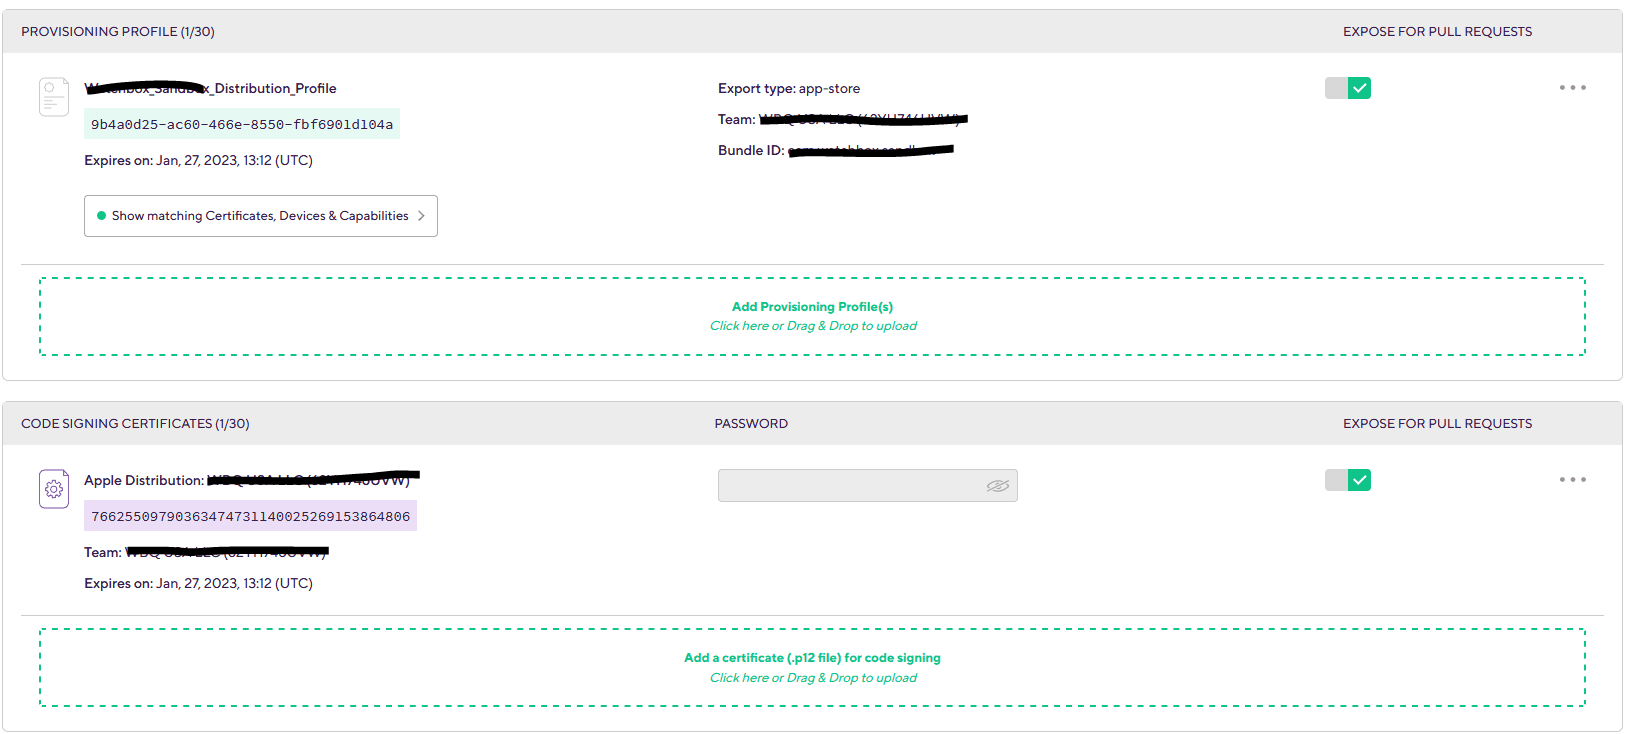
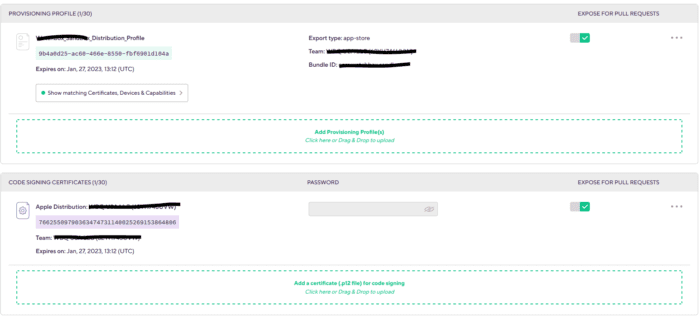
- Click open the Code Signing tab:
- In the box that says “Provisioning Profile”, upload the Distribution Profile.
- In the box that says “Code Signing Certificate”, upload the Distribution Certificate.
- Click open the Secrets tab, in this page you will input the passwords/credentials needed to upload a build to your Apple App Store connect record. In this window, setup the following secrets:
- APPLE_ID: put the email address of the Apple account being used by Bitrise to upload a build.
- APPLE_PASSWORD: put the password of the Apple account being used by Bitrise.
- APPLE_SECRET: put the value of the Apple App Password that is setup for the developer account referred to in APPLE_ID (this is a 16 character string generated when you setup 2FA on this account).
- Bitrise will have automatically created 2 new workflows for the app, in the dropdown selector find the workflow named “XXX”, click rename and call it “ios”. The astute reader will surmise that we are going to re-purpose this workflow for building the iOS version of the app.
- In the workflow editor, you will now layout the distinct steps needed to build and upload the app. Some of these are already added automatically within the existing workflow, just leave those as is and delete any that are referenced below. Use the +/- buttons to remove and add any of the steps listed below:
- Activate SSH key: leave this as is configured by Bitrise.
- Git Clone Repository: leave this as is.
- Bitrise.io Cache Pull
- Do anything with Script Step: leave this as is.
- Run npm command:
- Input “install” in the field marked “The ‘npm’ command with arguments to run”
- Run CocoaPods install
- Certificate and profile installer
- Set XCode Project Build Number
- Under “Info.plist file path”, input the relative path to the Info.plist file.
- If you already have builds you’ve manually uploaded to app store connect, then note down the last build number of the latest build and put that value in Build Number Offset. If you have no existing builds uploaded to App Store Connect, then set this to 1.
- Version Number: set the version number you would like to use for this build.
- Xcode Archive & Export for iOS
- I like to use an older version of this workflow step, so in the upper right select “3.2.x” from the version selection dropdown.
- Under “Developer Portal team to use for this export” input in the Developer ID that you retrieved from the pre-requisite steps.
- Deploy to Bitrise.io – Apps, Logs, Artifacts: leave this as is.
- Bitrise.io Cache:Push
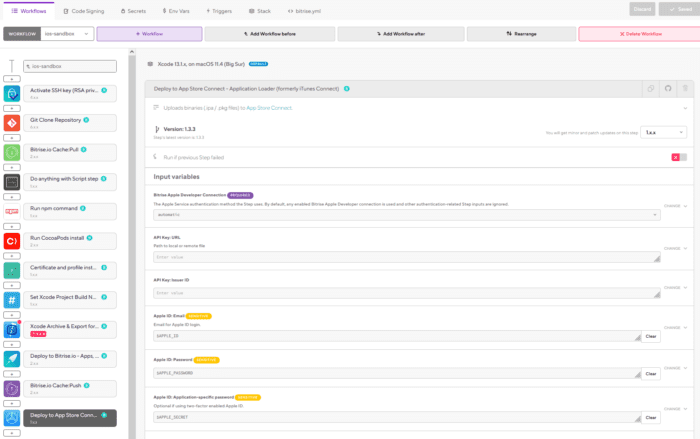
- Deploy to App Store Connect – Application Loader (formerly iTunes Connect):
- Under Apple ID:Email, select the code secret variable we setup named APPLE_ID
- Under Apple ID: Application-specific password, select the code secret variable we setup named APPLE_SECRET
- Under Apple ID: Password, select the code secret variable we setup named APPLE_PASSWORD.
- Click the Save button in the upper right, or press CTRL-S, and we are done!
4) Sit back and enjoy the fruits of build automation
- Go back to the top level of the app project in Bitrise, click on “Start/Schedule a Build”
- In the resulting window it will ask you to confirm the source branch to pull from and the workflow you’d like to run. Ensure the workflow selected is “ios” and press “Start Build”
Bobby Gill
Bobby Gill is the co-founder and Chief Architect of BlueLabel, an award winning digital product agency headquartered in New York. With over two decades of experience in software development, he is a seasoned full-stack engineer, software architect, and AI practitioner. Bobby currently leads the BlueLabel AI/ML practice, where he is leading a team of engineers operationalizing the transformational capabilities of generative AI within BlueLabel and for a number of enterprise clients.
Blue Label Labs Is Hiring
We are looking for exceptional people to join our exceptional team and build great things together.
See Our Current Open Positions