Apple does a lot of things right in their app development experience, but when it comes to application signing and distribution, the Apple developer experience has been a confusing mess for as long as I have ever been working on the Apple platform.
Specifically, the concepts of code signing certificates and provisioning profiles confused me 15 years ago when I first was introduced to the Apple developer ecosystem and, to this day, confuses me just as much as it did back then.
What are Code Signing Certificates and Provisioning Profiles?
Put briefly, a code signing certificate is the mechanism by which a developer proves that the app they are creating was generated by them as an individual (called a developer certificate) or from a certain organization (a distribution certificate).
These certificates that are used to “sign” any app that is uploaded to Apple’s app store servers allows any computer or device that downloads the app to verify who the publisher of the app is prior to running it.
A provisioning profile is bundled along with an app and it contains information which links the unique identifier of the app (called the bundle identifier) to the certificate of the individual (developer certificate) or organization (distribution certificate) which is publishing the app.
So when an iOS device tries to run an app downloaded from the app store, it looks at the provisioning profile to see which certificate is claimed to have published the app and is then able to verify that app is in fact signed by the included certificate.
In order to submit apps to TestFlight for beta testing or to submit to the app store for release, one step that is necessary is to manually generate the distribution certificate and associated distribution provisioning profile that will be used to sign the app at build time and which is submitted alongside it to Apple’s servers.
Recently, Apple has made this process somewhat automated to the point where developers no longer have to manually generate these items through an XCode setting called “Automatic signing”, however there are certain instances in which manual creation and association of these items is required, like for example when using many external CI/CD build tools like Bitrise.
In this article, I will walk through the steps of:
- creating an Apple distribution certificate,
- creating an app store distribution provisioning profile,
- as a final optional step, associating it with your XCode app project.
Pre-requisites
-
An Apple developer account.
-
A Mac computer (It’s not required in general, but this article will focus specifically on doing this from a Mac).
-
A bundle identifier is already created and registered in the Apple Developer portal for the app you are looking to distribute.
-
An XCode IDE installed on your Mac along with the source code of your app (only required for the last step).
How to Generate an Apple Distribution Certificate
1.) Create a Certificate Signing Request on Your Mac
- On your Mac, open up the “Keychain Access” app.
- In the menu bar, under “Keychain Access”, go to Certificate Assistant -> Request a Certificate from a Certificate Authority
- This will bring up the Certificate Assistant wizard, on the first page under user email address, put your email address in and then ensure the radio button for “Saved to Disk” is selected, then press Continue.
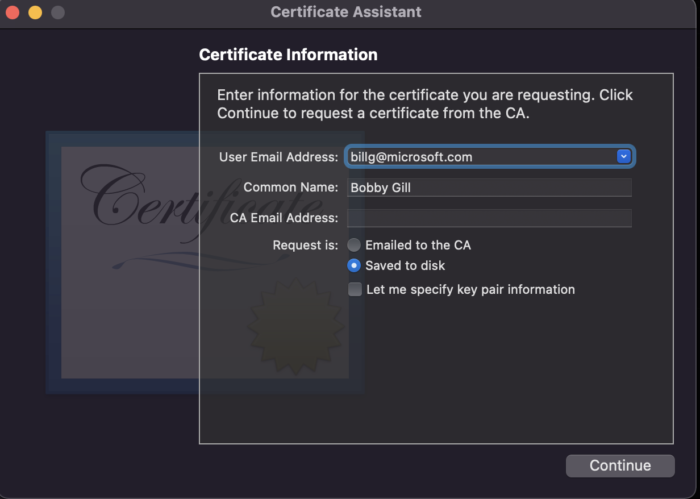
- This will then bring up a file save dialog, give your CSR file a name and save it to a location on your drive.
At this point, you will now have a CSR that is ready to be uploaded to Apple to generate a certificate.
2.) Create and Download the Distribution Certificate from Apple
- Login to the Apple Developer portal, on the left hand side bar click on “Certificates, IDs & Profiles”, then click on “Certificates” and the “+” button.
- On the next screen it will ask you what type of certificate you would like to generate and select “Apple Distribution”, then click “Continue”.
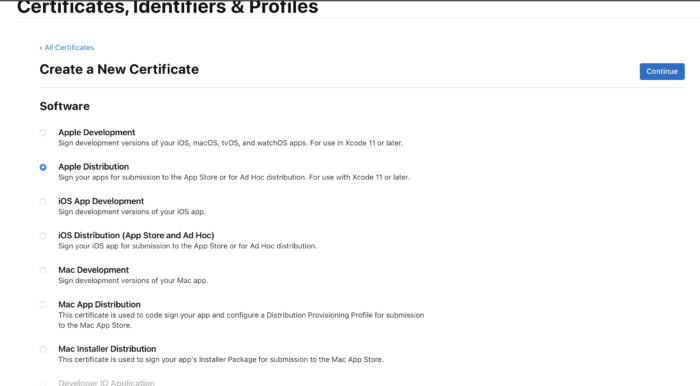
- Now you will need to upload the CSR file that was generated at the end of the last section. Once selected, click on “Continue”
- At this point, Apple will take the CSR and create the actual certificate with a file extension of “cer”, your browser will prompt you to save this file locally.
- Once the file is downloaded, then in Finder, double click on it and it should open up your Keychain Access app and you will now see that the certificate has been installed on your computer. At this point, your Mac machine now has both the public key portion and the super secret private key portion of your distribution certificate.
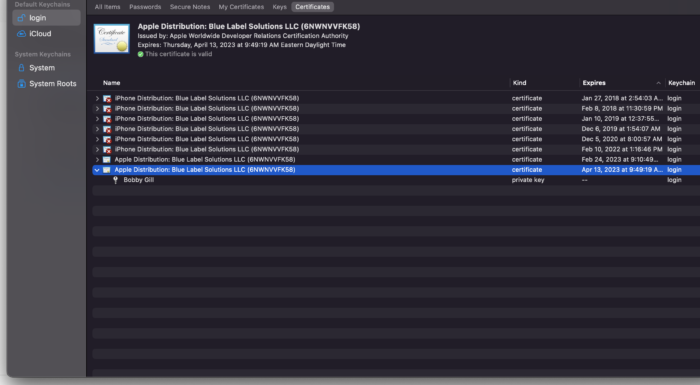
- If you are looking to use this certificate in a CD/CI tool and need to upload it, or you need to share it with another developer on your team, right click on the certificate and select “Export <Certificate Name>”. You will be prompted to create a password to secure the file, I recommend you do so to ensure not any ‘geek off the street’ can use the certificate. After selecting a file location you will see a .p12 file generated on your machine. This is what you will need to upload to an external build tool or give to your partner developers along with the password you entered.
How to Create an App Store Distribution Provisioning Profile
- Once the distribution certificate is created, return to the Apple Developer Portal and on return to the “Certificates, Identifiers & Profiles” section.
- Click on “Profiles” in the left hand navigation bar and then click on the “+” in the main area.
- On the next page, under Distribution select “App Store”.
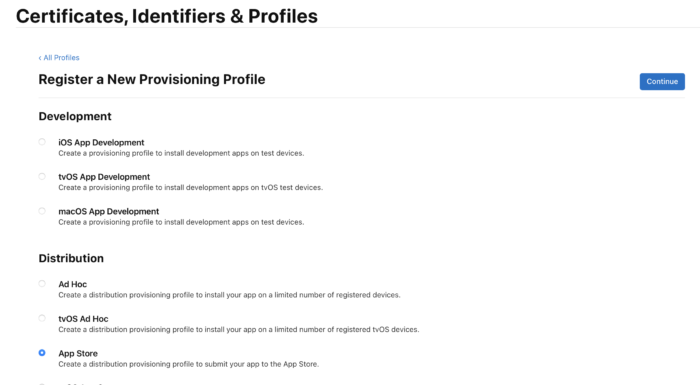
- On the next screen you will need to select in the “App ID” dropdown box the bundle identifier for your app then click “Continue”.
- Then you will need to select the certificate you created in the previous section and press “Continue”. If there are multiple distribution certificates listed, look at the date (note the year will be 1 year from the day you generated the certificate) beside the name to help you distinguish the certificate you generated.

- Finally, give your provisioning profile a name and then click “Generate”. This will create and download a provisioning profile with extension “mobileprovision”.
At this point, if you are not a developer, take the .p12 file and the .mobileprovision file and give them to your developer (and let them know the password on the .p12 file).
If you are comfortable working with XCode you can move onto the final step to configure XCode to use the certificate and provisioning profile when generating an release/archive build for upload to TestFlight/App Store Connect.
How to Specify the Certificate and Provisioning Profile within the XCode Project
- Once downloaded, locate the file in Finder and click on it. This should open up XCode, but you won’t see any UI or screens come up as the provisioning profile is installed into XCode silently.
- Open up the XCode workspace that contains your app code, then in the Project navigator, click on the name of the XCode Project for your app.
- In the settings content pane that opens, select under Targets the name of your app and then select “Signing & Capabilities”, and then click on “Release” in the sub-menu.
- This will bring up the Signing panel:
- Ensure “Automatically manage signing” is unchecked.
- In the Provisioning Profile dropdown select the name of the Provisioning Profile you generated in the previous step. If you don’t see it listed here it means you haven’t clicked on the provisioning profile after downloading it to your computer. Close XCode, click on the provisioning profile and then return to here and you should see it.
- If all is well you should see the “Signing Certificate” box below it change to the name of the certificate we generated earlier in the article.
At this point, the next time you generate an Archive build for upload to App Store Connect, XCode will use the new distribution provisioning profile and distribution certificate to code sign and upload to Apple!
Bobby Gill
Bobby Gill is the co-founder and Chief Architect of BlueLabel, an award winning digital product agency headquartered in New York. With over two decades of experience in software development, he is a seasoned full-stack engineer, software architect, and AI practitioner. Bobby currently leads the BlueLabel AI/ML practice, where he is leading a team of engineers operationalizing the transformational capabilities of generative AI within BlueLabel and for a number of enterprise clients.
Blue Label Labs Is Hiring
We are looking for exceptional people to join our exceptional team and build great things together.
See Our Current Open Positions